Preserves August 2018
Tomato Jam with Smoked Paprika
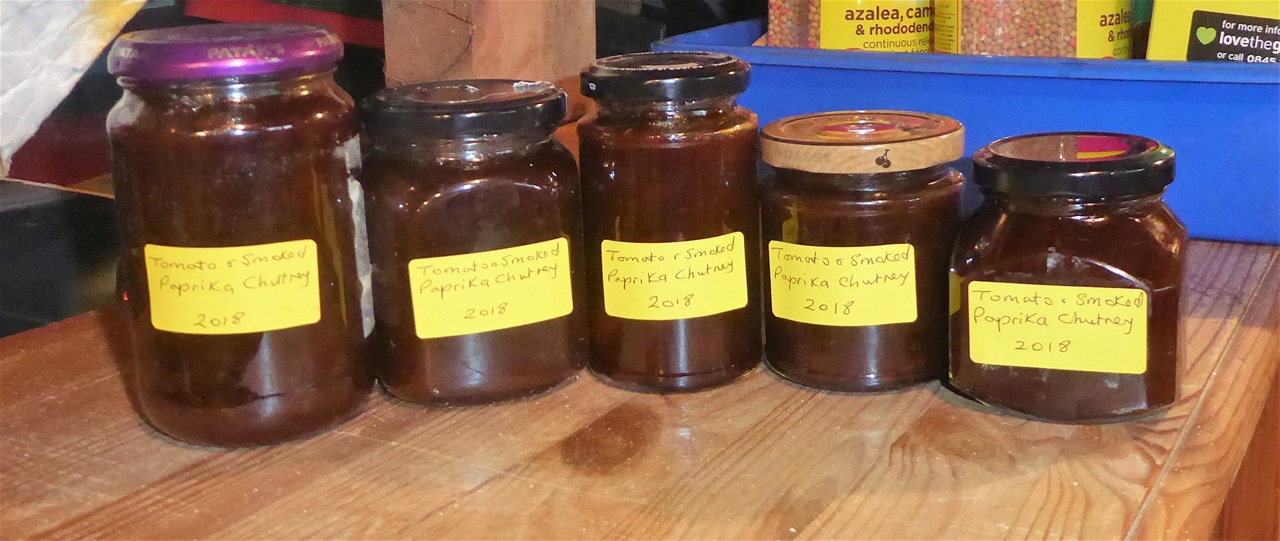
You can see I am running out of jars now.. I have had to delve in the back of the cupboard to find enough for this recipe... more are on order already so I am hoping for delivery soon, very soon!
I have never made TomatoJam before, so thought I'd give it a go, as we do have a bountiful tomato harvest this year. I had the idea that I could use all the orange and yellow tomatoes, and this would make a gorgeous golden-coloured jam. I also wanted to make it quite spicy and distinctive, so added chilli powder and smoked paprika... the jam turned our darker than I had imagined by a long way. It does taste good though, so I am sharing the recipe, for those of you who enjoy things with a bit of a bite. You could always leave out the chilli if thats not for you, and still have a pretty good jam.
The lemon juice and cider vinegar can be substituted for whatever vinegar you have to hand (Not sure about malt vinegar though...)
What you need:
2.5kg of tomatoes
2.5 cups sugar
1 heaped tsp chilli powder
tbsp smoked paprika
2 tsp salt
4tsp grated ginger (Or prepared ginger from a jar)
0.5 cup lemon juice
0.5 cup cider vinegar
What to do:
1. Prepare your jars and put in the oven to sterilise (100C) and pour boiling water over the lids in a small bowl
2. Cut out the cores of the tomatoes and roughly chop them (I didn't skin them) and put them in the pan
3. Warm through and then add all the other ingredients, stirring to mix
4. Bring to a boil and cook until "jammy" but not too thick as you don't want it to set solid, but be a little sticky. I cooked this for 45 minutes in total, boiling steadily. I stopped to stir and check after half an hour and then every five minutes or so
5. Take the jars out of the oven, and leave these and the jam to cool for five minutes
6. Pour the jam into the jars, wipe the edges, dry the lids and screw these on, finger tight
7. Leave until cold before labelling
This is great with cheese or cold meat, and also makes a side "pickle-like" side to a curry and rice too. It will of course keep in a cool place for months, due to the sugar content
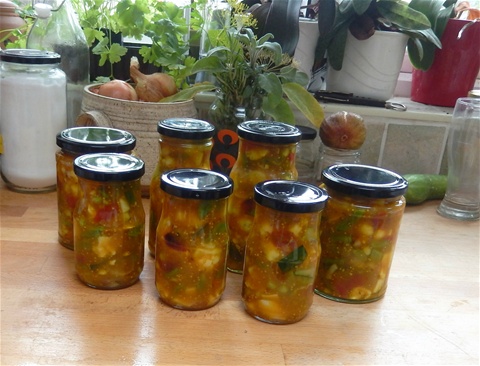
Basil & Tomato Sauce
Basil & Tomato Sauce
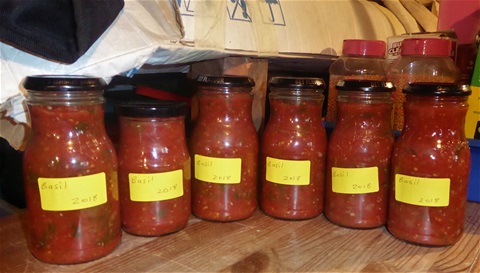
This year I am making more of these sauces that are water-bathed so that we can store them, and make the most of our fantastic tomato bounty. This one is very straightforward and extremely tasty, excellent with pasta but also can be added as a tomato sauce layer for lasagne, or anywhere passata would be used
These quantities made 7 x 440ml jars (One has been eaten so only 6 in the photo), but it is easy to adjust the amounts dependent on the weight of your tomatoes. The two keys to keeping it safely are:
- ensure it is basically acid. Tomatoes vary in their acidity, so the addition of eithevir negar or lemon juice is essential
- water bath correctly. My pan is not deep enough to immerse the jars completely, but having only the top inch sticking out seems to still do the job. Obviously I recommend full immersion, a case of "Do what I say, not what I do", but so far we have escaped botulism. The pop-down lids do indeed pop down and other seal well, so I am content that they are fine.
What you need:
5kg tomatoes, skinned and chopped (I used our food processor)
1 medium onion, sknned and finely chopped
3 cloves of garlic, finely minced (or use prepared garlic from a jar)
1 cup (275ml) either white wine vinegar or lemon juice
3 tsp salt
1 level tbsp sugar
packed cup of basil leaves,
What to do:
1. Wash your jars and put them on a tray in the oven at 100C. Put the lids in a small bowl and pour boiling water over them. (I put newspaper in the tray first, which helps clear up any drips when I come to fill the jars)
2. Put the chopped tomato and onion in a large, non-reactive pan with the garlic and lemon juice or vinegar, and bring to the boil
3. Keep at a controlled boil /high simmer until the sauce is the kind of consistency you like. I prefer it not watery but not as thick as a jam either. This batch of sauce cooked for 25 minutes, with the occasional stir. Turn off the heat
4. In the meanwhile coarsely chop the basil leaves
5. Take the jars out of the oven and leave to slightly cool. Dry the lids carefully and pour boiling water over your ladle and funnel
5. Add the salt and sugar to the sauce,stir to dissolve, and taste to adjust seasoning if needed
6. Stir in the basil, bring to the boil again to ensure the basil is not totally raw
7. Wait 5 minutes, then pour the sauce into the jars, up to the shoulders
8. Wipe the edges of the jars with a damp kitchen paper to ensure no sauce is either on the lip or around the screw section. Careful.. the jars are very hot
9. Put on the lids and screw finger tight... again, remember they are hot
10. Get the water bath ready (I use the same pan, washed, as I only have one really large one). Put a folded teatowel in the bottom of the panso that the glass jars are not in direct contact with the metal of the pan.
11. Stand the jars on the teatowel
12. Pour boiling water from the kettle until the water is as deep as the pan will take without bubbling over when it is boiling. (I need to use 2 kettlesful)
13. Bring to a steady boil (more than a simmer) and keep it at this for 25 minutes. I have never had to top up the water in this time, but if you have a smallish pan, kep an eye on it in case more is needed
14. Carefully remove the jars, using oven gloves to protect your hands, and stand on a tray. Tighten the lids a little more and set aside to cool
15. When the jars are cold, add labels... you might think you will remember what they are, but will you, in several months' time???
And that is it. You can make all sorts of tomato-based sauces in the same way. This week's was another curry-base, starting with frying onions and garlic with spices, before adding the other ingredients (except the basil) and I shall be doing another today, loaded with coriander leaves and ginger. They'll keep us going for months!
Preserves August 2017
What you need:
10 cups of cherry-plums
(about 3lb)...
1 cup chopped onion
3 or 4 star anise
1 cup water
2 tbsp. finely minced ginger
3 cloves of garlic, finely minced
1 tsp salt
1 cup
white wine vinegar
2 cups of granulated sugar, with another cup held in reserve
1 tbsp ground coriander
1 tbsp ground all spice (or 1tsp ground cloves and 1 tsp ground cinnamon)
1tps ground chillies
What to do:
1. Using a large, thick based pan, put in the plums, onion, water, star anise and vinegar, bring to the boil and simmer until contents are very soft (about 30 minutes) At the same time, put your clean jars in the oven
to sterilise... this quantity makes about three one pound jars
2. Allow to cool slightly, and then rub through a sieve into a bowl. Discard the stones, skins, star anise etc
3. Pour the liquid into a clean pan and add the sugar and spices.
4. Simmer until a fairly thick, but not as thick as jam.
5. Taste, and add more sugar if needed. Ensure extra sugar is fully dissolved
6. Turn off the heat, remove jars from oven and allow to cool for 5 minutes. Sterilise the lids with boiling
water and dry with clean tea towel
7. Pour sauce into jars and seal immediately. (It is supposed to be slightly runny when cold)
This keeps for at least six months in a cool, dark place, unopened. Our last batch was fine after a year tbh. Once the jar has been opened, it is best to store in the fridge.
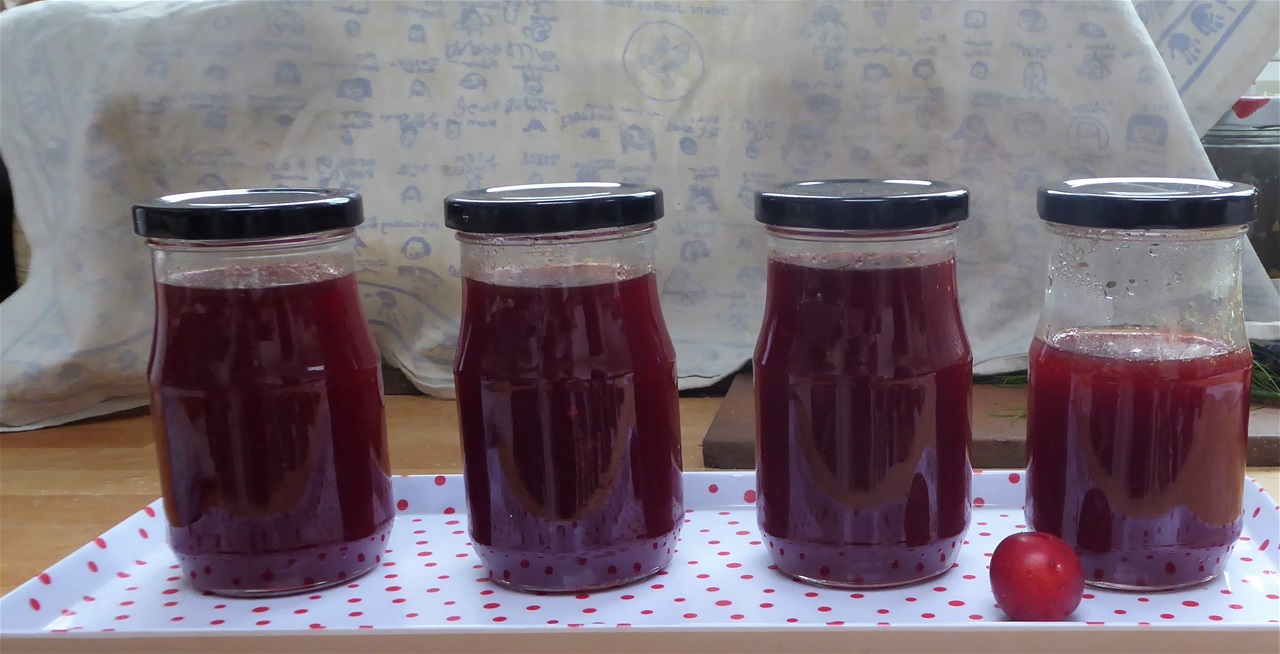
PS They are not labelled as the jars were still warm when I took the photo

Green Tomato Chutney
Green Tomato Chutney
Faced with the large pile of green tomatoes saved from the plants affected by Late Blight, I decided to have another go at a chutney. Green tomato has never been one of my favourites, so I thought I'd add lots of things I do like and hope that it ends up tasting good and perhaps a little bit Christmassy. Well, it tastes just fine, complementing mature cheddar rather nicely, so it is safe to share the recipe!!
This amount filled four lb jars, plus another half size not quite to the top. Make sure your jars have vinegar proof lids. The longest part was the preparation of the tomatoes. One of the thing I feel I did wrong in the past was to chop them up and throw them in, core and all, and that core gave a fairly unpleasant texture. This time I cut all the cores out and chopped the remaining fleshy bit plus the jelly seedy bit into pieces just over a centimetre square, which, together with the other ingredients, has given a decent chunky texture but not too coarse and lumpy for sandwiches. Together with the cooking time, it took me just under 2 hours, including washing up and putting everyhting away again
Don't be put off by the long list of spices: anything you do not like can be omitted and anything that is your favourite you can increase, or indeed add, My advice would be make a half size batch if you are unsure and then chnage it if not to your taste. Only fennel comes through in this mix as a "top note" though, which we like a lot. The others blend well and do not dominate.
I have to say when I first tasted it it seemed very chilli-hot, but already it has mellowed, so don't be anxious that the finished chutney will be blow-your-head off-hot. If this is what you want, then adding minced green chillies as well would do the job
What you need:
15 cups of green tomatoes, prepared as above
3 cups of dark brown sugar: this adds to the flavour
2 cups of green sultanas (any will do, I just happened to have these already)
2½ cups peeled and chopped onion (not minced... you need some texture)
2½ cups white wine vinegar (again, use which you like, but best to avoid malt vinegar)
1 heaped tsp salt
2 tbsp fennel seeds
2 tbsp black or yellow mustard seeds
1 level tsp ground allspice, or mixed spices like you use at Christmas
1 heaped tsp freshly ground nutmeg
1 cinnamon stick or ½ tsp ground cinnamon ... don't overdo this, omit if you use mixed spice
3 tbsp chopped crystallised ginger (pieces about half the size of a sultana)
2 heaped tsp chilli powder (see note above about heat required... this amount matures to a pleasant warmth, not a hot chutney)
What to do:
1. Prepare your jars: Put washed jars in the oven on a tray lined with newspaper, at 120°C. Put the lids in a bowl, with the funnel and ladle, over which you can pour boiling water when they are needed
2. Put all the ingredients straight into a large non-aluminium pan (I use a non-stick saucepan 33cm in diameter, as it gives a good surface area for evaporation to take place during cooking, and of course is very easy to clean)
3. Heat and stir to dissolve the sugar, the bring to the boil
4. Boil until dragging a spoon along the bottom of the pan leaves a channel which does not immediately flood with liquid. Mine boiled for 38 minuts, but this is dependent on how juicy the tomatoes are. Do not overboil though as your chutney wil be very thick and hard to get out o the jar when it has cooled.
5. Turn off the heat and take the pan off the stove
6. Take jars out of the oven and cover with a clean teatowel. Leave for three minues to cool slightly
7. Sterilse the lids etc with boiling water. Dry lid with clean teatowel or kitchen roll
8. Spoon or ladle the chutney into the jars, using a sterlised skewer to release any trapped air bubbles. Fill to the bottom of the neck of the jar
9. Wipe round inside the neck of the jar using a clean damp paper towel, and screw on lids straight away. Do not put wax discs on the surface: these are not needed
10. Leave until cold, before cleaning the outside of the jars and labelling
Recipes I have read say is best to let chutneys mature for a couple of weeks, as this will lessen any vinegar flavour, but we ate some of this last night and it was just fine. I think this practice came from the days where malt vinegar was used for all chutneys to be honest. Having that part-jar means it is easy to test out when you think it tastes good enough to eat before opening a whole jar
Unopened, this will keep for a year in a cool, dark place, and once opened, will be fine in the kitchen cupboard... it won't be there long!!
Bramble & Rosemary Jelly, hot from the pan
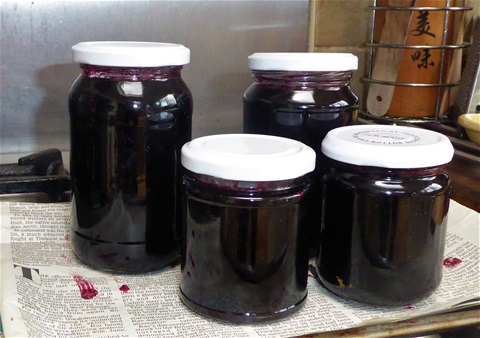
Bramble & Rosemary Jelly
Blackberries are ripening early this year, and having a large bowlful rather took me by surprise. I remembered that last year I attempted this jelly and it didn't set too well, so as blackberries picked at the start of the season seem to have more pectin in them, I thought I'd give it another go. It is very good as a condiment with roast meats, especially chicken, and adds a depth of flavour to meat sauces or gravies. My friend Lesley said it would be good on toast too, so I guess she liked it.
What you need:
4 or 5 cups of blackberries
½ cup water
1kg sugar approx ... (see No 3 below)
2 large twigs of rosemary, each about 15cm long
3 tbsp white wine vinegar
What to do:
1. Put the berries and water in a large pan and cook down gently until very pulpy
2. Put the rosemary twigs in a large bowl, pour the berries into a jelly bag over the bowl, and allow to drip overnight. Do not squeeze the bag as it will force particles through the fabric and make the jelly cloudy
3. Add the vinegar to the juice, measure the volume and weigh out the amount of sugar required, with 1gm per ml of juice: a litre of juice will need 1 kg of sugar
4. Put the jars in the oven at 120°C, on a tray lined with newspaper, and a small saucer in the freezer
5. Pour the juice into a large pan and add the sugar. Heat gently until sugar is completely dissolved
6. Bring to the boil and remove the rosemary
7. Boil the syrup until setting point is reached. I had a litre of juice and it took 9 minutes of boiling. Test by putting half a teaspoon of juice on the freezing saucer, and if it wrinkles when you push it with your finger, take the pan off the heat. If not, boil for a further 2 minute and test again
8. Remove any scum with a slotted spoon. This forms from the waxy surface of the berries and is nothing to worry about. Leave removing it until the end as it all collects together and can be scooped off easily
9. Take the jars out of the oven and allow to cool slightly
10. Sterilise the lids, funnel and ladle by pouring boiling water over them and dry with a clean teatowel
11. Ladle the jelly into the jars, filling right to the top of the shoulders of each jar
12. Place a waxed disc, wax side (shinier side) down onto the surface of the hot jelly, wipe the inside of the neck of the jars and put on the lids. Leave to cool. If you do have to move the tray of jars before the jelly is cool make sure you keep it level to avoid the jelly splurging up the inside of the neck of the jars
And there you are, a lovely batch of Bramble & Rosemary Jelly. My litre of juice made 2 x1lb jars and 2 x ½lb jars, with a tablespoonful left over for tasters.
Preserves August 2016
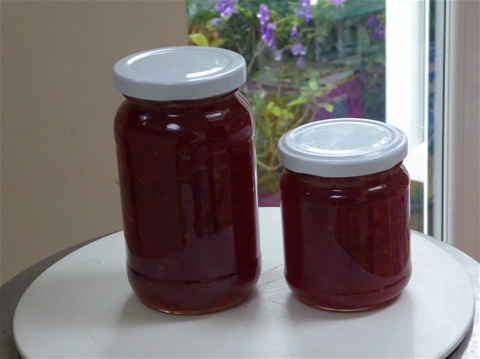
Ruby Grapefruit marmalade
Ruby Grapefruit Marmalade
We made this in some haste as I had forgotten we had entered the Marmalade Class in the local Show. It is absolutely delicious, as well as being super speedy. It was awarded a First, so we are not the only ones who like it! This quantity made about two one-pound jars' worth, which is a half jar more than in the photo. The other one went straight into the kitchen cupboard to use on our breakfast toast. It would be easy to double up the recipe but remember the setting point boiling time will be slightly longer with the larger volume.
What you need:
2 large grapefruit
5 cups of sugar
juice of two lemons
What to do:
1. Put the grapefruit in a large pan of cold water so that they float freely, bring to the boil and boil gently for two hours. You might need to top up the hot water so keep an eye on it. You can sterilise your jars and lids in this time.
2. Allow the grapefruits to cool in the water, until you can touch them without burning yourself
3. Pour the water away. Slice the grapefruit as finely as you can right through. Remove any pips and chop the flesh a bit. Put into the preserving pan. Put a small plate in the freezer to use when you test for setting point later.
4. Add the sugar and lemon juice. You can use white granulated, or part jam sugar. It does affect how quickly the marmalade reaches setting point - there is enough pectin without jam sugar, provided by the membrane of the grapefruit plus the lemon, but I was in a hurry!
5. Bring to the boil, stirring to dissolve the sugar. Any remaining pips will float to the surface so are easily removed. If you have used half jam sugar, the marmalade will reach setting point very quickly so boil for six or seven minutes and then test with some on the plate from the freezer... wrinkling of the surface means it is ready. Mine took only eight minutes, so be careful not to overcook or burn it.
6. Leave for five minutes, stir to distribute the peel evenly and then pour into warm sterilised jars. Screw on the lids straight away
And that's that! Amazingly quick, no need to make masses of it and cutting the grapefruit is very easy. I shall have a go with tangerines when they are in season: they will not need a two hour boil though.
Piccalilli
I like piccalilli, but never seem to get around to making any, so this year I have made a concerted effort to get some in the jars with enough time for it to mature before the festive season arrives. I had to buy a cauliflower for this, as we haven't grown any.
This recipe is Pam the Jam's from River Cottage, exactly as she gave it, so many thanks, Pam! I made 2kg as I want some for presents and plenty to share at home too. I now know that this was not the brightest of things to do: I had to rinse the vegetables in two batches after salting as there was too great a volume to move them about in the largest bowl I have.
What you need:
I used 2kg in total of: cauliflower, runner beans, pattypan squash, batons of cucumber, small tomatoes cut in half including some green cherry ones, shallots sliced into 25cm rings and whole nasturtium pods.
Pam also listed courgettes, carrots, tomatillos, peppers, silver skin onions and french beans as possibilities, plus:
100g fine salt ( I used kosher)
60g cornflour
20g ground turmeric
20g English mustard powder
30g yellow mustard seeds
2tsp crushed cumin seeds
2tsp crushed coriander seeds
1.2l cider vinegar
300g granulated sugar
100g honey
What to do:
1.Place in a large bowl and sprinkle with the salt. Mix well, cover the bowl with a tea towel and leave in a cool place for 24 hours, then rinse the veg with ice-cold water and drain thoroughly.
2.Blend the cornflour, turmeric, mustard powder, mustard seeds, cumin and coriander to a smooth paste with a little of the vinegar. Put the rest of the vinegar into a saucepan with the sugar and honey and bring to the boil.
3.Pour a little of the hot vinegar over the blended spice paste, stir well and return to the pan. Bring gently to the boil. Boil for 3–4 minutes to allow the spices to release their flavours into the thickening sauce.
4. Remove the pan from the heat and carefully fold the well-drained vegetables into the hot, spicy sauce. Pack the pickle into warm, sterilised jars and seal immediately with vinegar-proof lids. Leave (if you can) for 4–6 weeks before opening. Use within a year.
And I found out the hard way that it is much easier to spoon the completed pickle into wide-mouthed jars.Choose your jars accordingly!
I am keeping all the preserves recipes together as I use them a lot and want to be able to find them easily!
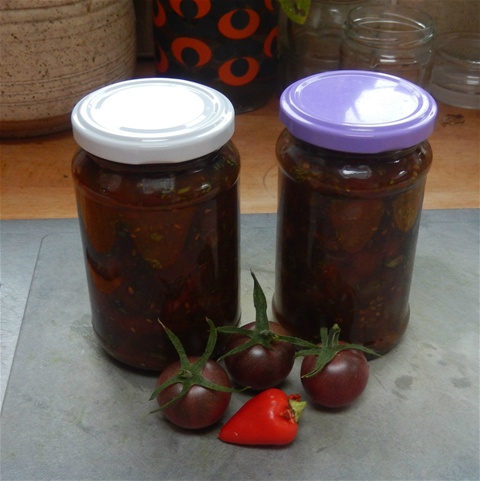
Chocolate Cherry & Chilli Chutney with Coriander
Chocolate Cherry & Chilli Chutney with Coriander
Buoyed up with the success of the yellow tomato jam, I decided to tackle the ever increasing weight of our chocolate cherry tomato harvest with a chutney. Abi had commented that the yellow one was a bit sweet for him, and maybe I could make something a bit spicier. So this is it, and spicy it is indeed. Using fresh basil in the jam had worked well, so I wondered how fresh coriander would fare. It could take double the amount if you want more than a kind of under current of flavour. The chocolate cherries resulted in a beautiful rich dark colour. Overall, OK for a first attempt though and it met with Abi's approval, which is no bad thing. It'll be staying "on the list"! This amount filled three 500g jars.
What you need:
900g chocolate cherry tomatoes, cut in half or quarters if largish ones
2 large onions, chopped
3 large red chillies, finely chopped, with seeds for extra heat (This is where you can zizz it up if you like... I used Razzamataz chillies, which last year were very hot but this year are much milder, so I added two heaped teaspoons of dried chilli flakes from last season, as well)
6cm piece of ginger, grated
1 star anise
300g soft brown sugar
250ml white wine vinegar
3 tps fish sauce
1 packed cup of chopped fresh coriander
What to do:
1. Prep your jars and lids!
2. Put all ingredients except the fish sauce and coriander in the preserving pan, bring to the boil and simmer for 30 minutes. The onion should be soft, the tomatoes mashed down, and drawing a wooden spoon along the bottom of the pan should leave a runnel that does not immediately fill up again with liquid. Cook for a further five minutes if needed: it depends on how juicy your tomtoes are
3. Add fish sauce and cook for 2 minutes... this can be omitted if you do not wish to use a fish product, in which case add a level tsp of salt
4. Turn off the heat and stir in the coriander
5. Allow to cool for five minutes, stir again to evenly distribute the coriander, and pour into jars, removing any air bubbles with a bamboo skewer. Put on the lids straight way.
Now I am writing this, I realise I left the star anise in, so one jar will have a whole one inside! Never mind, I daresay it'll come to light before anyone eats it. At least I hope so!
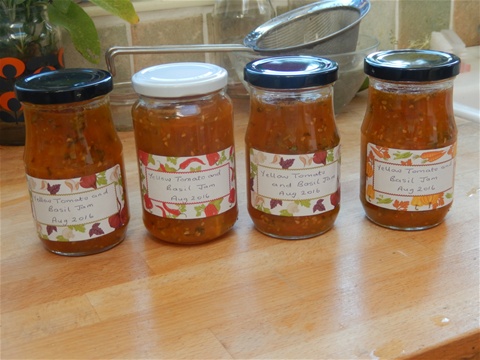
Yellow Tomato and Basil Jam
Yellow Tomato and Basil Jam
I seem to have grown far more yellow and orange tomatoes than red this year, and so have been looking for a way to use these that would show off their colour and sweetness. A friend was making Tomato and Basil jelly, so, after a bit of a think, here is a recipe that seems to do the job, especially as there was a huge Greek Basil plant growing on our kitchen windowsill at the time for inspiration! This amount made four one pound jars plus a half pound one
What you need:
800g yellow or orange tomatoes
3 cups white granulated sugar
½ cup lemon juice
zest of two lemons - You can omit this if you don't like lemon, or add more if it is something you enjoy. You do need the juice however, as it helps the jam to set.
½ cup roughly chopped basil (Cut this just before stirring in as otherwise the edges of the leaves go a bit black)What to do:
1. Chop the tomatoes into pieces about 1cm across, put them in the preserving pan and stir in the sugar. Leave for an hour to allow the some of the juices to be drawn out
2. During this time you can prep your jars and also put a small plate in the freezer to use for checking the setting point.
3. Once the hour is up, bring the mixture to the boil and add the lemon juice
4. Cook on a medium boil for 30 minutes, then turn off the heat and check for setting by putting a small amount on the cold plate. It will wrinkle when pushed after two minutes if it is ready. If not, boil for a further three minutes and test again. Repeat if necessary. (Mine took 36 minutes)
5. Take off the heat completely, stir in the lemon zest and basil. Leave for five minutes, then stir again.
6. Pour into jars and put on lids while still hot.
I would assume this keeps well, as any other jam would, but once it is opened keep in the fridge just in case! It is the first time I have made this, so I'll let you know next year how it lasted, if we have enough left to test it. What I can say though is that is goes very well with strong cheese, is delicious spread over cheese on toast and in cold meat sandwiches. I also plan to use it as a glaze on barbecued chicken, warmed and painted on towards the end of cooking.
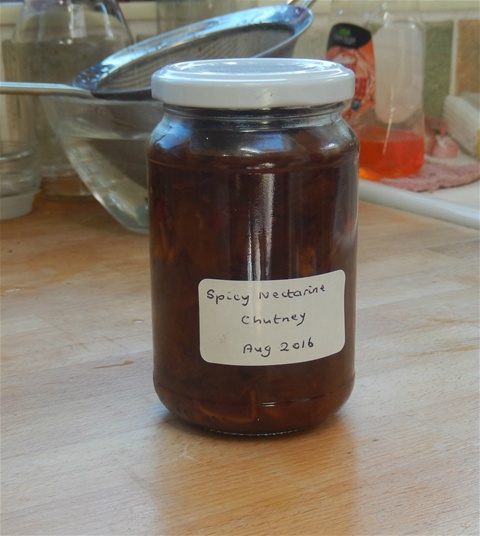
Spicy Nectarine Chutney
Nectarine & Chilli Chutney
If you like mango chutney, then this might appeal to you. It is sweet, yes, but you can make it as hot as you like with the chilli. I used two Albertos Locatos (without the seeds -- they are large and an unappealing dark colour) but you can use any red chillies you like the taste of, in whatever quantity suits you. You can also vary the spices: crushed methi seeds (fenugreek) are a very good addition, and my second batch will certainly be includng these. It is also incredibly quick to make, which when I am dealing with a kitchenful of produce several times a week, is a real bonus!
The nectarines are not home grown, but were in the reduced section in our local supermarket. At 40p for nine, it seemed silly not to buy them at that price, to widen our preserves bank. Luckily there were more on my following visit, as the first batch of chutney is almost gone already!
What you need:
700g of chopped nectarines. I did not skin them, as the red skins looked so good, and soften well during cooking. This amount was one punnetful of nine fruits
1 sliced white onion
1tbsp sunflower or vegetable oil
3cm piece of ginger, peeled and cut into matchsticks
fresh red chillies (see note above) finely chopped, seeds included if you like
1 tbps cumin seeds
seeds from 20 green cardamom pods
200g soft light brown sugar
25oml white wine vinegar
What to do:
1. Heat the oil in a non-aluminium pan and add the onion
2. Cook onion slowly until soft
3. Add all the other ingredients and bring to the boil
4.Simmer for 40-45 minutes until the nectarine is very soft. Stir occasionally
5. In the meanwhile, sterilise the jars and lids. Keep these warm
6. When the chutney is softened and there is no vinegar visible, take off the heat and leave to cool for five minutes
7. Stir before putting into jars. Put on the lids while hot
This keeps very well in a cool dark place ...up to a year... but it is so delicious it may not last all that long! Great in sandwiches, or as an accompaniment to any "curry and rice" style meal
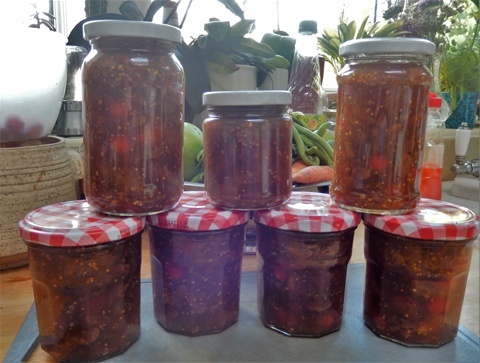
This is a double sized batch of Mixed Tomato Chutney
MIxed Tomato Chutney
I first made this three or four years ago to use up a large number of cherry tomatoes which I didn't want to skin as this can be fiddly. Since then it makes an annual appearance, in several variations, some with green fennel seeds, some with cumin and coriander and some just plain tomato, plus anything else that comes to mind while I am cooking up a batch. I can almost make it on automatic pilot now, whch gives plenty of space in my head for thinking at the same time, unlike totally experimental things that need my full attention. I have given you amounts for a relatively small volume, as not everyone grows tomatoes in huge quantities, and it is easier to mulitply up rather than scale down I reckon.l This makes around 3lb so choose your jars accordingly, sterilise these and keep them warm. Don't forget the lids need to be vinegar-proof.
What you need:
1kg of mixed cherry tomatoes, including a good 80-100g of tiny ones such as 100s &1000s if you have them
100g sultanas or raisins (I like using green raisins)
350g granulated sugar
Fresh red chilli - I added one large Alberto Locata, but if you prefer you can add three cayennes, or leave them out altogether. Use what suits your taste
400g onion
300ml wine vinegar (I used white this time, but red is nice, or a mixture or the two. Cider vinegar works well too)
2tbp yellow mustard seeds
1tbp fennel seed
1tsp kosher salt or sea salt
What to do:
1. Chop the onion and red chilli(es) if using. I use a food processor and blitz them both together.
2. Put in a large non-aluminium pan with the vinegar, with all the other ingredients except the tomatoes. Stir to ensure the sugar dissolves, bring to the boil and simmer for 30 minutes
3. In this time you can halve the cherry tomatoes. Leave the very small ones whole and keep them separate
4. After 30 minutes add the halved tomatoes and bring back to the boil. Simmer again for around 25-30 minutes until thickened. There should be no vinegar visible that is not incorporated into the mixture. If there is. cook for a few minutes more, stirring to make sure the chutney does not stick to the bottom of the pan.
5. Stir in the whole tomatoes and take off the heat. Leave for five minutes
6. Using a funnel, fill the jars to within ½ cm of the top, and with a wooden skewer, wiggle out any air bubbles, then wipe the edges of the jars clean and put on the lids.
This will keep for at least a year (even two, I found out last week -- one appeared from the back of the cupboard) somewhere cool and dark.
This is a very versatile recipe, as you can use up some green tomatoes too as part of the weight, if you have any at the end of the season. Just chop them and add them at the same time as the onion. There is no need to skin them.
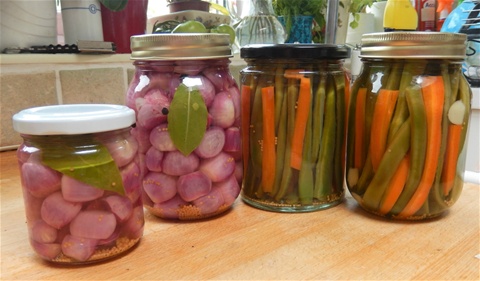
PInk Pickled Shallots and Green Bean & Carrot Pickle
Green Bean & Carrot Pickle
This is a tasty addition to salads, especially in the Winter when there may not be much on the plot to eat fresh, as it gives a decent crunch as well as tasting good. It can also accompany cold meats or cheese with crackers. Last year I made a version with French Beans, flavoured with lemon & rosemary, which was surprisingly good but I thought I would ring the changes this year, and just for once we have some decent carrots!
What you need:
Enough vegetables to fill two 500g kilner style jars, trimmed to fit in vertically as in the photo here, with the carrot batons a similar thickness to the beans. Blanch these, two minutes for the beans, three for the carrots, cool under running water and dry them.
700ml white wine vinegar
100g white granulated sugar (This keep the colours of the vegetables much brighter than using brown sugar)
1tbp yellow mustard seed
1 tbp whole black peppercorns
3 bay leaves
1 tsp kosher salt
What to do:
1.Sterilise the jars and their lids, and keep them warm
2. Put the vinegar and the other ingredients (except the vegetables) in a large non-aluminium pan and bring to the boil. Turn off the heat
3. In the meanwhile fit the vegetables into the jars, packing them fairly tightly and leaving enough headroom for the tops to be covered with vinegar and have about 50mm space at the top of the jar still
4. Remove the bay leaves and pour the vinegar carefully into the jars.
5. Using a chop stick or a bamboo skewer, wiggle out any air bubbles and seal the jars Do not overtighten the lids as they will contract as they cool, otherwise you may not be able to undo them later
Store in a cool dark place for three or four weeks before eating: it will last for at least a year unopened however.
You will probably have some vinegar left. Do not pour it away but keep it to add to another recipe, such as this next one
Pickled Pink Shallots
You can of course use any shallots for this, or even overgrown spring onions, but I do like the appearnace of the pink ones in their jars, and small shallots are much easier to fit in tightly so that they all stay submerged in the vinegar
What you need:
500-600g shallots, enough to fill your jars - this amount filled one 500g jar plus one smaller one
2 tbps kosher salt
700ml white wine vinegar (If you have any left from the previous recioe then use that as part of the volume
2 bay leaves
1 tbps yellow mustard seeds
1 tbp whole black pepercorns
2 small red chillies, split lenghtways in half, or some dried chilli flakes (optional)
1 tbp coriander seeds (optional)
What to do:
1. About an hour before you start, put the shallots in a large bowl and cover with boiling water. Leave to stand
2. After an hour the water will be cool, so take out the shallots one at a time and peel them. Doing this helps the skins come off easily and reduces their eyewatering tendency too!
3. Put them in a bowl of cold water, to which the salt has been added. Leave them overnight
4. The next day sterlise the jars
5. Make the spiced vinegar in the same way as the previous recipe
6. Rinse and dry the shallots, then pack them tightly into the jars so that they will not float in the vinegar but stay submerged.
7 As you are doing this, include a bay leaf and chillies in each jar, poking them down so they are seen at the edge, using a bamboo skewer
8 Once the jars are full, remove any airbubbles and screw on the lids
9. These need to mature for a month to six weeks befor eating
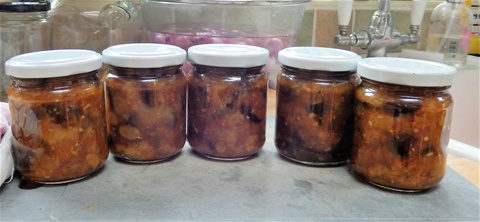
Hot Aubergine Chutney
Hot Aubergine Chutney
Indian-style chutney tends to be fresh and eaten the same day, whereas here in England, making chutney is a way of preserving some of Summer's bounty to eat later in the year, especially when there is a glut of bounteousness!The original recipe came from Val Harrison, and I have hardly changed it... if it ain't broke, don't fix it ... so thank you Val!
This year we have had a good crop of aubergines, but some years it is dismal. In this case, I buy a large bag of aubergines for £1 at our local greengrocer shop, which makes this chutney quite economical still.
Be warned, this is quite spicy, but more chilli can easily be added to your taste
What you need:
2 lb (1 kg) aubergines
3 tablespoons salt - I used kosher, just in case!
6 oz (175 g) soft brown sugar
12 fl oz (350 ml) white wine vinegar (5%)
3 oz (75 g) seedless raisins
1 heaped tablespoon tomato puree
5 cloves of garlic
1 lb (500 g) onions
1 teaspoon chilli powder
3 red chillies ( I actually used just the one -- a huge fat Alberto Locoto, which is pretty hot)
What to do:
1.Slice the aubergines, put into a colander and sprinkle with the salt. Leave for at least three hours over a bowl to catch the juice, then rinse and dry.
2.Put the sugar, vinegar, raisins and tomato puree into a bowl, mix and leave to stand so the dried fruit plumps up a bit
3.Finely chop the onions and red chillies and put into a preserving pan with all the other ingredients, including the aubergines. (I did the chopping in a food processor)
4. Heat gently, stirring until the sugar is dissolved, then simmer until thickened. You might need to add another cupful of vinegar if the mixture is very dry. The aubergines take a little while to cook down, maybe 15 minutes or so, but do not leave it unattended in case the mixture burns at the bottom
5. Pour into hot sterilized jars and seal. Use lids that are vinegar proof!
This can be eaten straight away but does taste quite vinegary. If you leave it for a couple of months I think it is much nicer. We eat it as a condiment with rice dishes, or as a spread in cheese sandwiches.
This quantity makes around 3lb (1.5kg) altogether
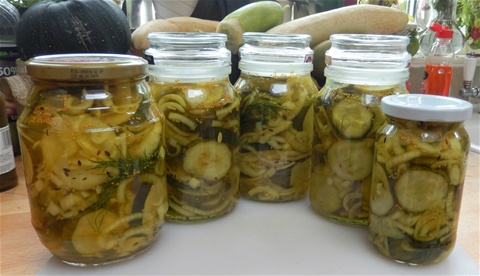
Bread & Butter Pickles
Bread & Butter Pickles
This is not made of bread and butter, nor made to eat with bread and butter either (unless you want to) but is so called because in the Southern States of the USA folk made it out of the ingredients they could grow, and traded it for goods they needed ie it was their "bread & butter".
However it got its name, the pickles help preserve a glut of cucumbers in a delicious and long lasting way, and is very easy to make.
You must however, use salt without any anti-caking agent in it and the best I have found is Kosher salt, which is readily available on-line (with next day delivery even!) Using table salt gives the cucumbers a greyish colour which is quite unappetising. I learned this the hard way last year, so please do share my learning if you want your pickles to look nice and green.
I like recipes that use cup measures as is saves getting out the scales. As long as you use the same cup each time it keeps the proportions the same, so it does not need to be a special measuring cup. I have an old mug which has lost is handle but I like the picture on it so didn't want to throw it away: does the job.
This quantity fills five 500ml kilner style jars. As you can see from the photo I have used a range of jars I had to hand, which have plasticised insides to the lids, which prevents vinegar corrosion of any metal.
What you need:
6lb of cucumbers. I used normal long cucumbers, but gherkins are fine, or snacking cues. If the skins are very tough, peel them off.
3lb of onions. Again, any you have to hand will be fine. I used white, but red would be as good
½ cup of kosher salt
ice cubes
4 cups of white wine vinegar - make sure it is at least 5%
4 cups of white granulated sugar
2 tbsp yellow mustard seeds
1tbp fennel seeds. I used ones that were still green on the plant as they have not ripened yet
1 tbp black peppercorns
1 tsp turmeric
2 sprigs of dill frond per jar (optional)
What to do:
1. Slice the cucumbers into slices about 5-6mm thick. Thin slices go rubbery, and thicker ones stay more crisp
2. Thinly slice the onions as huge thick pieces are a bit strong. It is a lot of onions to slice, so remember to breathe through your mouth and don't rub your eyes!
3. Put the cucumbers and onion in a very large bowl (I used my large preserving pan, which is teflon lined --aluminium is not OK), mix them carefully together and sprinkle the salt over them.
4. Put a layer of ice cubes over the top of the mixture and leave overnight, topping up the ice cubes before bed, if you can. Cover the bowl with a lid to stop your house smelling of raw onion!
5. Next morning, wash the jars in hot soapy water, rinse and put in the oven at 150 °C to sterilise them.mStanding them on a newspaper-lined tray makes it easier to take them in and out. The lids will need to have boiling water poured over them before being used. Do not put the rubber seals in the oven. Alternatively they can all go through a hot wash in the dishwasher
6 Rinse the cucumbers and onions thoroughly under the running cold tap. You need to rinse off as much salt as possible or your pickles will be unpleasantly salty when finished. Drain them in a colander. You might need to do this in two batches
7. Put the vinegar, sugar and spices (not the dill fronds) in a very large pan (not aluminium), bring to the boil and then boil gently for 10 minutes. Make sure the sugar is fully dissolved
8. Add the drained cucumbers and onions, bring the mixture back to the boil and then boil gently for just one minute. Turn off the heat and take the pan off the hob
9. Take the jars out of the oven, sterilse the tops with boiling water and dry these. Leave everything to cool slightly for 5 minutes
10. Now fill the jars to within an inch of the top. If possible, get some of the slices to face outwards against the jar sides, bu this is only important for presentation, not flavour!
11. As you fill, push two springs of dill down the insides of each jar.
12. Check to make sure there are no airbubbles trapped in the vinegar. If there are any, poke a sterilised wooden chopstick or skewer down to dislodge them.
13. Top up the jars now to within 1 cm of the top (The push-on lid coffee jars I used need more space left than this to enable the lids to go on properly) and screw on the lids.
14. Wash the outside of the jars as they will have some sticky vinegar on them no doubt. MIne certainly did! Label the jars when they are dry
15 Leave in a cool dark place for 3 -4 weeks before eating. They keep unopened for at least a year, ut once they are open, keep them in the fridge.
Madhusudana swamy
I like the recipes
Kathy
Oh good! Let me know if you make any of them, won't you?
Linda Barratt
Hi Kathy, are your cups American cups or a teacup?
Kathy
I use a mug that holds 275ml. Hope that helps
Kathy
Hi Anne. The Dancing with Smurfs have the right colour, so it will look good! You can by fish sauce in the "Asian foods" section in supermarkets: mine is Blue Dragon brand. Hope that helps!!
Ann Clarke
Ooohhh, some of these look yummy Kathryn! I have a lot of dancing with smurfs coming along which are very dark, so may try them in the chocolate and cherry recipe! Where do you get fish sauce from?
Kathy
So glad you like them. Lots to follow at this time in the year!
Beryl Davies
Thank you, what lovely photos,recipes.Will keep on popping back in to see what else your up to.xx