Preserves October 2018
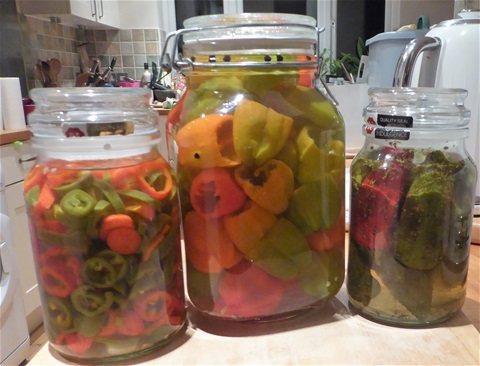
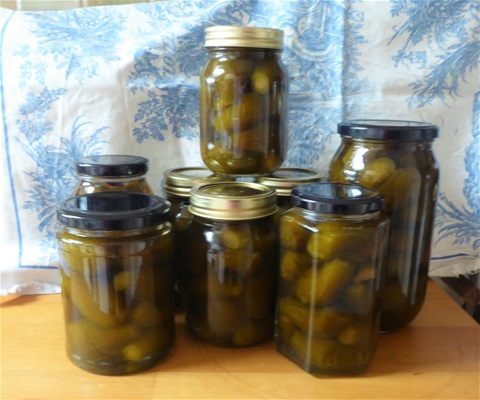
Left to right : Jalapeno & Cherry Chillies, and Padron Peppers
Pickled Chillies
Having been away for a couple of weeks, there was a sudden rush to gather in the chillies before they were spoilt by frosts. The polytunnel only offers 3 or 4 degrees of protection, and chillies are not keen on the cold!
I ended up with several different varieties, and so spent two afternoons on these three different pickles. They should all last well enough until the end of the year in the cold garage, and probably beyond if we don't eat them all before then.
It is difficult to be precise about the weight of chillies, as often there is a glut, or perhaps one variety didn't do so well, so I have given a general pickling liquor recipe, that can be adjusted to your own taste, and the volume of the prepared chillies:
Pickling Liquor:
2 cups of white wine vinegar
2 cups of water
2 tbsp white sugar
1 tbsp sea salt or kosher salt
Put all the ingredients into a saucepan and heat gently until just boiling, stirring to ensure the sugar and salt is dissolved. Any remaining liquor can be stored in ascrew to bottle or sealed plastic pot until needed
NB - Do wear gloves when preparing chillies, to avoid stinging your fingers, or worse still, accidentally transferring chilli juice to your face or eyes
Tip- Remember to wipe the edge of the jar mouth and the lid seal before closing the jar as if they have sticky liquor on them, opening the jar again may be difficult
Here are the three different pickles:
Pickled Jalapenos
We have been using Jalapenos for ages, and the plants ("Early Jalapeno") have been prolific. These are the best of what remained after freezing a few of them
What you need:
Enough jalapenos to fill the jar or jars you are using
2 cloves of garlic per jar
2 bay leaves per jar
What to do:
1.Sterilise your jars and keep them warm
2. Wash and dry the jalapenos
3. Wearing gloves, cut off the very top of each fruit with the stalk attached and discard
4. Using a small, sharp knife, remove each chilli core with seeds attached, by cutting it out in a conical shape. Knock out any remaining seeds and slice the fruit into rings approximately 3mm in thickness
5. Heat your pickling liquor to boiling, turn off the heat and put the chilli rings into the pan, together with the crushed garlic and bay leaves. Leave for 10 minutes
6. Put the rings into the prepared jar, and pour in the hot liquor to cover.
7. Using a clean skewer, move the rings about to ensure there are no air bubbles, top up the jar if needed, and seal
8. These will be ready to eat after a day or two, and make a tangy addition to sandwiches or salad
Pickled Cherry Chillies
These are similar to the ones bought as Peppadew peppers ("PIquante") which can be stuffed with cream cheese and the aim is to have some to offer as part of a buffet meal over the coming festivities. Any cherry-style chilli would wokr well though. They did take ages to ripen, and I had hoped the the ones picked green would quickly turn red, but they were very slow and some began to soften alarmingly, so I used some green ones too. They look OK in the jar, and if other chillies are anything to go by, will taste less sweet than the red ones, but hopefully will still be tasty.
What to do:
1. Sterilse your jars and keep these warm
2. Wearing gloves, remove the core and seeds from each chilli, and put them in a large bowl, together with the crushed garlic
3. Heat the pickling liquor until just boiling, and pour over the chillies in the bowl to cover them. Leave for 10 minutes
4. Using a slotted spoon, put the chillies into the prepared jar. Try to keep them as upright as possiblt to ensure air does not become trapped underneath them. Manipulating them carefully with a clean skewer and spoon helps
5. When the jar is full, pour in the hot liquor to cover all the chillies
6. Now move the chillies slightly with a skewer to take out any air bubbles, then seal the jar. If you tip the jar slightly, more air bubbles may appear, and if thise means that the level of liquor goes down, then top this up.
Pickled Padron Peppers:
These are usually served grilled, rather thanbeing eaten raw, so I had to look around for a method of preserving them that could retain this pre-cooking, and found a recipe in Allrecipes that looked straightforward. I adapted it slightly as I was a bit concerned that the pickling liquor may not fully penetrate the chillies. I also felt it might need an extra flavour so have added some dried oregano, as pappers like this are served in Mediterranean areas and oregano grows wild there. This is the first time I have made a preserve in this style,so I decided to make just one small jar to try it out.
What to do:
1. Sterilise your jar and keep this warm
2. Trim the stalk of each pepper, but leave on the top of the fruit. Poke several small holes in each one with a sharp skewer
3. Put about 1tbsp olive oil in a small frying pan and "griddle" the peppers gently until they start to blister but not so far that they blacken. If any puff up with trapped air, then poke them with the skewer. You are aiming to be able to expel the air in them when they go in the jar, and it needs to be able to escape
4. When they are ready, put the peppers in the prepared jar, sprinkle in dried Oregano to taste and add 2 cloves of crushed garlic
5. Half fill the jar with hot liquor, press down on the peppers with a wooden spoon, and then top up the liquor to cover them fully. Clean the edges of the lid and jar, then seal
As this is the first time I have made this pickle, I thought I should try it before posting a recipe, to make sure it was good. I snipped off the top end of one pepper to try and it was delicious... but you know how every so often a Padron is explosively hot? Yes, that's right ... I go that one!! The flavour was good though, so you can make this without worry that it will be boring in any way
Preserves October 2017
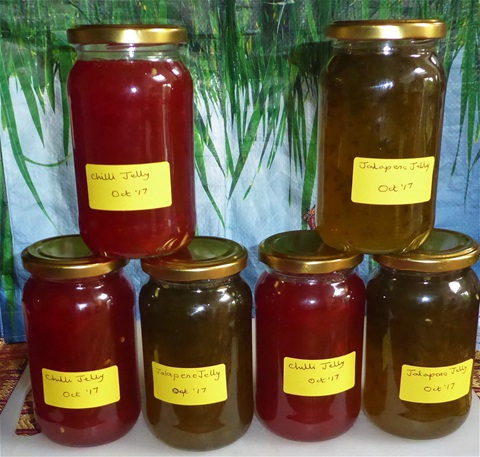
Sweet Red Chilli Jelly & Jalapeno Jelly
Sweet Chilli Jelly/ Jalapeno Jelly
This has only three ingredients and is simplicity itself to make, but oh, so luscious. It is one I make every year, and is a nice addition to Christmas hampers, being a beautiful colour and not too hot for the faint hearted either. It goes very well with a cheese board, with sandwiches or indeed stirred into gravy for roast dinner too. I try to save up enough chillies to be able to have the right quantity to go with a kilo of sugar because it saves weighing or measuring it, but you can adjust the quantities to suit whatever you have available. The heat can be adjusted by using more chillies and peppers or reduced vice versa. I used roughly half and half for this batch
What you need: (This makes approx 1.5 l so choose your jars accordingly)
250g red chillies and red peppers, deseeded and without pith (wear gloves for the chillies if you use hot varieties) - see note above
1kg jam sugar, or white granulated sugar plus one sachet of pectin powder/liquid
500ml white wine vinegar
What to do:
1. Sterilise jars and keep warm. Put a saucer in the freezer to use to test for setting point
2. Put the cut up chillies and peppers in a food processor with about two thirds of the vinegar, and blend until they are small pieces
3. Pour into the preserving pan, with the remaining vinegar
4. Add the sugar (and pectin if not using jam sugar), heat gently, stirring to dissolve
5 Bring to a rolling boil (ie when the mixture is full of bubbles and rises up the pan a bit) for 8 minutes
6. Test for a set using the cold saucer: the liquid will wrinkle slightly when you push it with your finger as it cools.
7. If it is not set, boil for a further two minutes, when I'd be surprised if it wasn't ready. Don't over boil as it will set hard otherwise
8. Leave to cool for 10 minutes and stir before pouring into warmed jars, wiping the necks of the jars and putting on the lids. (Leaving for a while helps with flecks of chilli distribute evenly through the jelly)
Jalapeno jelly needs one very large green pepper (or two smaller ones) and enough jalapenos to make up the weight. Other than that, it is exactly the same ingredients and method. It does have a really fresh flavour and keeps a decent green colour too
Both jellies keep for at least a year in a cool, dark place, and I have never refrigerated them after opening: they have been fine
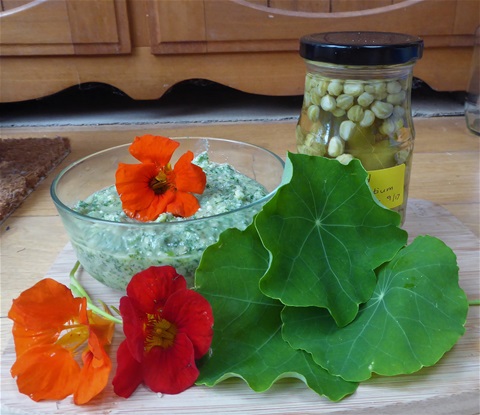
Nasturtium Leaf Pesto and Pickled Nasturtium Seeds
Nasturtium Leaf Pesto
We add nasturtium leaves and flowers to salads every year, and enjoy their peppery taste, so I have no idea why it took me so long to think of using the leaves in pesto as well. After all, rocket leaves work well, so why not nasturtium?
We ate half of this first batch with last night's pasta with chicken and I shall be making up another batch very soon, as it was so delicious. Nasturtiums turn to mush at the slightest touch of frost, so I shall have to be quick
What you need:
About 40 Nasturtium leaves with stalks... make sure you avoid any with blackfly on the back of them, or those nibbled by caterpillars
A handful of shelled walnuts (or any other nuts that appeal to you)
75g finely grated parmesan or other strongly flavoured hard cheese
3 cloves of garlic, skinned
½ cup olive oil (I don't use extra virgin olive oil for pesto as I like the flavours of the other ingredients to shine through, but use it you if prefer)
What to do:
1. Sterlise your jar and keep it warm
2. Rinse the leaves in cold water, and fill a bowl with clean cold water
3. Blanch the leaves in boiling water for 8-10 seconds, remove immediately with a slotted spoon and plunge into the cold water. Push the leaves under the water with the spoon.
4. Pick up all the leaves in your hand and wring as much water as you can out of them
5. Put the leaves, still in a ball, into a food processor with the nuts, garlic and half the oil. Grind to a rough paste and turn off the processor
6. Push down any mixture up the sides of the bowl. Turn the processor back on and slowly enough oil to make a loose paste. Don't worry if it looks a bit wet at this stage
7. Add the cheese and mix in quickly. Turn out into a small bowl or your jar
8. If there is insufficient oil in the pesto to cover the top of it, pour on some more gently. Cover the bowl or seal your jar
In the fridge, in a sterile jar, this will keep for at least three months, although in a covered bowl it'll certainly last a few weeks too.
I promise you this is totally luscious and could easily be eaten spread on nice bread or used as a dip, as well as stirried into hot pasta.
I am now wondering what it might be like made with feta instead of a hard cheese, so if the frosts stay away long enough I shall be giving that a go too!
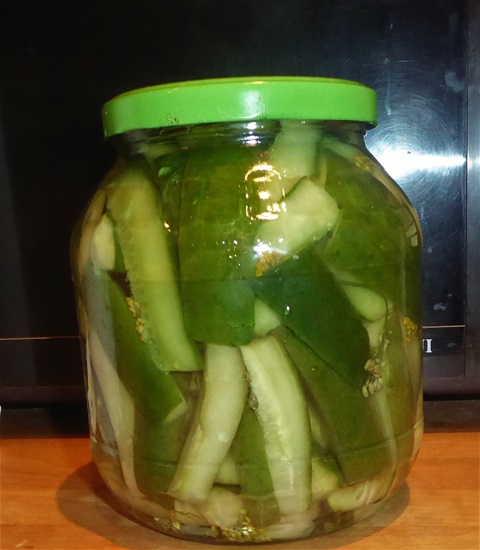
Cucumber Dill Pickles
Cucumber Dill Pickles
See the note below about Nasturtium Seeds
This year we have had a huge glut of cucumbers and this is one of our favourite pickles to make, with a nice flavour of Summer provided by the dill. Quick and easy too! I made a double quantity, and decided to put them all in the one jar. Once the jar has been opened it'll live in the fridge, but unopened, in a cool dark place, the cucumbers stay nice and crisp for well over six months. (Using sea or kosher salt keeps the cucumbers stay green)
What you need:
750g Cucumbers, sliced lengthways into quarters and most of the seedy jelly cut off, then cut into 5-6cm batons.
3tbsp kosher or sea salt
600 ml white wine vinegar
100g white granulated sugar
5 Dill flower heads, or heads of green seeds
What to do:
1. Put the prepared cucumbers in a large bowl and mix with the salt, using your hands. Leave covered with a large plate overnight
2. Rinse the salt off the cucumbers and leave in a colander to drain
3. Sterilise the jar(s) and keep warm
4. Gently heat the vinegar and stir in the sugar to dissolve
5. Tightly pack the cucumber batons vertically in the jar, with the dill heads evenly distributed
6. Pour the vinegar into the jar, ensuring the tops of the cucumber pieces are covered and that there are no air bubbles
7. Wipe the edges and top of the jar to ensure there is no sweet vinegar remaining on it, and screw on the top. This should make sure you can get the lid off again!
This time, I wanted the clean flavour of dll alongside the taste of the cucumbers themselves, but you can add all sorts of different spices to the vinegar, such as mustard seeds, cloves, coriander or cumin seeds, or garlic and chillies if you'd like.
Nasturtium Seeds can be pickled in a similar way, soaking them in brine overnight before rinsing them thoroughly and putting them in a warm, sterile jar, before pouring some warm vinegar (with sugar if you like) over them. I sometimes add a bayleaf too.These seeds are an excellent substitute for capers, especially in Tartare Sauce
PS You can see a jar of these in the photo above, with the pesto. There are some more seeds to go in and fill the jar right up
These jars contain 4.5kg of fruit, so a single kilo would fit into two 350g jars I think
Green figs in rose syrup
This is the recipe that I referred to in my blog, which took so much work to produce. However, if you are only making a more normal amount, such as using a kilo or so of figs, rather than the 9kg I started with, it would be much more straightforward. A week later, the figs are tasting pretty good, so here is the method, and be reassured there is no trace of the dreaded latex now!
I am pleased to have found a way of using these little figs, which would otherwise have gone straight into the compost bin otherwise as there was no chance of them ripening outdoors at this time in the year
Latex can be very irritating, especially when combined with the rough fig leaves as you gather the fruits, so wearing gloves is a good precaution when picking and preparing them. Do not use a non sstick pan for the initial boiling, as you have to scrub hard to remove the latex from around the edges of it, and your non-stick pan would never be the same again. I used a stainless steel one. When you get to making the syrup and boiling the figs in it, a non-stick pan works well Forewarned is forearmed!
What you need:
1 kg of small green figs, the ones picked off the tree in the Autumn If you have slightly more or less, it will be fine, as long as you make a little more syrup for a larger amount. Make sure they will fit in the pans you plan to use so you can make them all in one go, though!
3 cups of sugar
½ tsp rose essence
6 cloves
½ tsp vanilla essence
Juice of one lemon
What to do:
1. Wearing gloves, trim off the stem of each fig and cut a cross in the base - the point of this it to allow the latex to escape.
1. Put the prepared figs in a large bowl of water. If the water turns very milky, change it for fresh a couple of times, then leave the figs to soak overnight, weighted down by a plate to ensure they are all submerged.
2. The next day, drain the figs and put them in a pan of fresh water, bring to the boil and boil for 20 minutes. Drain and cool: I used ice water to cool them down quicker
3. Repeat Step 2 - The point of this is that the expansion and contraction of the fig flesh enables the release of all that latex, so it is quite important!
4. While the figs are cooling the second time around, start making the syrup. Put the sugar in a nonstick pan large enough to take all the figs in one go, and add a cupful of water. Stir and heat until the sugar is dissolved completely. Put in the cloves
5. Reduce the syrup by about a third.
6. Add the rose essence and the vanilla. Remember that the syrup will be further concentrated so don't overdo the rose. You can always add more later if you need to
6. While the syrup is boiling, sterilise your jars and keep warm in the oven
7. Put the cold figs in the syrup, with the lemon juice, and boil down again until thick and syrupy. This takes about 15-20 minutes
8. Check the flavour of the syrup and adjust if needed. Do not worry that the figs lack flavour at this point: they will steep in the syrup in their jars.
9. Once the syrup is ready, pack the figs tightly in warm jars and pour in the syrup to cover them completely, leaving about 1cm space at the top of the jar.Poke out any air bubbles with a sterile bamboo skewer, and then put lids on. Straight sided pickle jars are easiest to use.
10. Leave the figs for at least a week before eating them: they get better the longer they are in the syrup.
These are very good with vanilla icecream, or good, thick plain Greek yoghourt. Next year I shall try a batch with lemon syrup as well as the rose I think.
Lausanne Tranter
Thankyou! Lovely recipes.