December 2018
27th December - Tangerine Baked Cheesecake
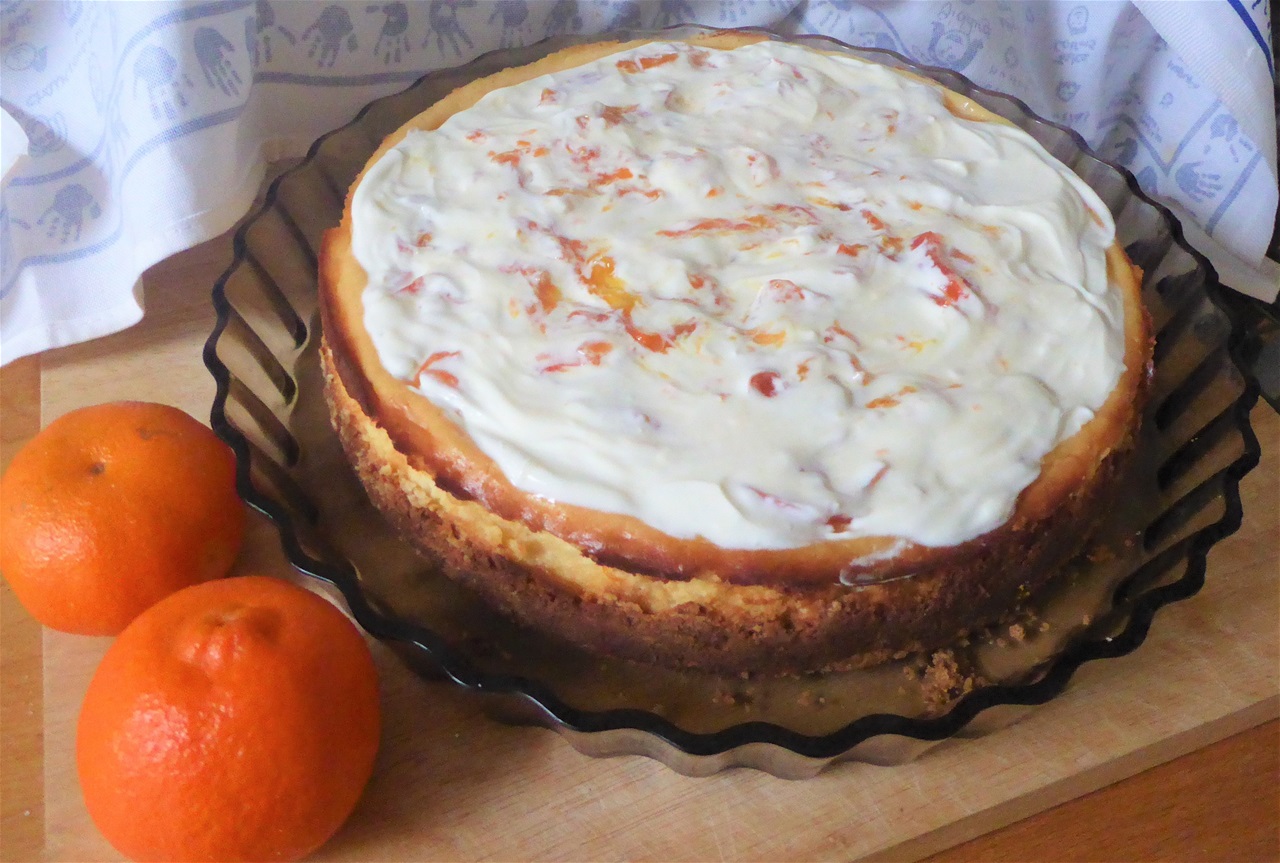
Baked Cheesecake has been a favourite of mine since the first time I tasted one, age 18. Hard to believe, but back then cheesecake was not commonplace, and only available in expensive delicatessens. I was bought one as a treat and what a treat it was too!
Over the years I have made several versions, but now find this method to be quick to make and reliable to bake too, with a nice smooth even top and rarely a crack to be seen
To make it seasonal, I used tangerines, as they were always a traditional part of Christmas for us, plus I was itching to use the last jar of tangerine marmaladeYou could easily substitute any marmalade, and change the fruit accordingly.I have made a lemon one and a lime one before, and I expect oranges would be good too. I made a raspberry jelly version in the Summer, topped with fresh raspberries
What you need: (makes 12 slices, but feeds 8 who like a large slice)
250g digestive biscuits
100g butter
600g cream cheese
250g mascarone cheese
2 eggs, plus 2 more egg yolks
175g caster sugar (I used white, but golden would be fine too)
4 tbsp flour ( I've always used plain flour before but I only had SR and it was fine)
zest from 4 tangerines
juice of 2 tangerines
3 drops of orange oil (you could use lemon, or omit this)
150 ml sour cream
4 tbsp tangerine marmalade
What to do:
1. You will need a 23cm spring form tin. Line the base with a circle of baking paper. Turn on the oven 150C fan
2. Melt the butter in a small saucepan, and crush the biscuits, amking sure there are no large pieces left (I bashed them about in a large with the end of the rolling pin, as I had no plastic bag available)
3. Put the biscuit crumbs in the saucepan and mix with the butter until thoroughly combined
4. Pour the buttery crumbs into the tin, and firm into a level layer in the base. Put the tin in the fridge
5. In a large clean bowl, put the cream cheese, mascarpone, tangerine zest and juice, orange oil (if using), flour,sugar, eggs and extra yolks. Using a large spoon, mix together until smooth. If there are any lumps, use a large balloon whisk to mix them in.
6. Take the tin out of the fridge and pour in the cheese mixture. Bump the tin on the worktop a couple of times to remove an air bubbles
7. Put in the middle of the oven, and cook for 35 minutes. It will look pale and a bit wobbly at this point
8. Turn off the oven, leaving the cheesecake in there for 3 hours
9. The cheesecake will then look dry on the top and be much firmer
10. Remove from the tin once cold. If there are any cracks, they will be hidden by the topping
11. Now put half the marmalade onto the top of the cheesecake, fairly evenly.
12. Spread the soured cream over the maramalade, and the swirl in the remaining two spoonsful of marmalade.
13 Chill until serving
This is a very forgiving recipe, as any small cracks or uneveness in the cheesecake will be hidden under the topping. However, if it is perfect, a light dusting of icing sugar can be all that is needed befpre serving. It will keep in the fridge for a day or two, but it is best to keep it covered so that any odours from other foods do not affect the flavour
26th December 2018 - Coconut Macaroons
With two egg whites left from a previous recipe, I decided to have a go at Coconut Macaroons. These are not the posh Macarons sandwiched together delicately with butter cream, but the more rustic style cakes from my childhood. Thye did turn our quite well, and I shall want to make more so am adding the recipe here so I can easily find it and use the same quantities.
It does mean you can make some if you like, too. They are crisp on the outside and soft and chewy in the middle. The ones I remember had a piece of glace cherry in the middle, but there were none in the cupboard so I used these diamond jelly sweets instead
What you need:(makes 8)
2 egg whites
100g caster sugar
100g desssicated coconut (I used unsweetened, but if you only have sweetened, reduce the sugar by 10g)
1 level tsp flour (I only had SR, and it was fine)
1 tsp vanilla extract
pinch of salt ( I put this in as I always add it to meringues, so thought it ought to go in here too)
8 jelly sweets or half glace cherries

What to do:
1. Turn the oven on, 140C fan, and line a baking tray with non-stick baking paper
2. Tip the eggwhites into a large mixing bowl and whisk until frothy.. no need to use a mixer
3. Now add all the other ingredients, mixing well with a large spoon,to ensure everything is evenly distributed. (The mixture will be soft and sticky)
4. Put 8 even-sized blobs on the baking tray, and with a wet finger tidy them so they are roughly circular
5. Put one jelly sweet/half glace cherry on each, and put the tray in the oven, on the centre shelf
6. Cook for 14 minutes, when the coconut should look tinged golden brown
7. Allow to cool on the tray, as they will be very soft when hot. Remove from the paper with a spatula or wide bladed knife to ensure they don't break
8. They keep well in an airtight tin for up to three days
15th December 2018 - Candied Orange Peel

A friend of mine makes these every year, and every year come the time I fill the Christmas gift boxes and bags, I usually wish I had found the time to make some too. A very cold and rainy day has kept me indoors, so I decided to have a go.
These are not perfect. They were tricky to take out of the syrup as I left them a little too long, so next time around (maybe some grapefruit peel?) I shall try to remember this. As a result,they are a bit crooked, but still taste pretty good.
What you need:
4 large, thick skinned oranges
4 cups of granulated sugar
1 cup of water
1tsp vanilla extract
granulated sugar to coat or 125g dark chocolate
What to do:
1. Peel the oranges, keeping the peels in large pieces. I cut each fruit into quarters and then took the skin off each in a single piece. You need to leave the pith on them
2. Cut the peels lengthwise into strips 0.25cm wide
3. Put the peels in a stainless steel or non-stick pan, cover with cold water and bring to the boil
4. Simmer for 15 minutes and strain, throwing away the water
5. Repeat this twice more. This removes any residues from the skin, and softens them so that they will absorb the syrup
6. Now put the cup of water, sugar and vanilla in the saucepan, heat gently and stir untl the sugar is fully dissolved
7. Return the peels to the pan, bring to the boil and simmer until they are translucent. This shoud take 25-30 minutes and there should be actual syrup still visible in the pan
8. Remove and drain the peels. You can keep the syrup to use as a flavouring if you wish
9. Put two wire cake racks onto some newspaper to catch any sticky drips, and lay the peels on the racks, not touching each other.. they will be very hot!
10. Leave until nearly dry.. they should be a bit sticky still. This will take about 3- 4 hours in a warm kitchen
11. Roll the peels in granulated sugar to coat
12. Alternatively, melt some dark chocolate in a bowl over a saucepan of boiling water, dip each peel in the chocolate to coat one end, then place on non-stick baking parchment to solidify (I had some milk chocolate left from making truffles, so used this up first, before melting in some dark)
13. When dry, store in an airtight container.
Despite their boggled appearance, these do taste very good. I am sure yours will look much more regular. There were quite a lot of small pieces of peel left at the end, as some had broken up when I over-boiled the syrup, so I chopped these finely to use as a garnish for chocolate pots in the New Year. They will keep well in a small sealed box,
November 2018
17th November 2018
Having been given a bag of Bramley apples, I wanted to use some of the slightly bruised ones, so of course used this as an excuse to make an apple cake. I wanted something a bit diiferent so included some chilli... next time I shall add more to increase the heat a little more, but I am giving you the recipes as I made it, and you can adjust the chilli yourself, or of course leave it out entirely if you think it too weird. (The idea of incIuding dried orange peel was borrowed from a recipe in a Sunday magazine) I didn't want to get the mixer out, so used a method that requires just the one bowl, and using a ready made paper liner for the cake tin to save time and fiddle, it took a mere 15 minutes to get this in the oven
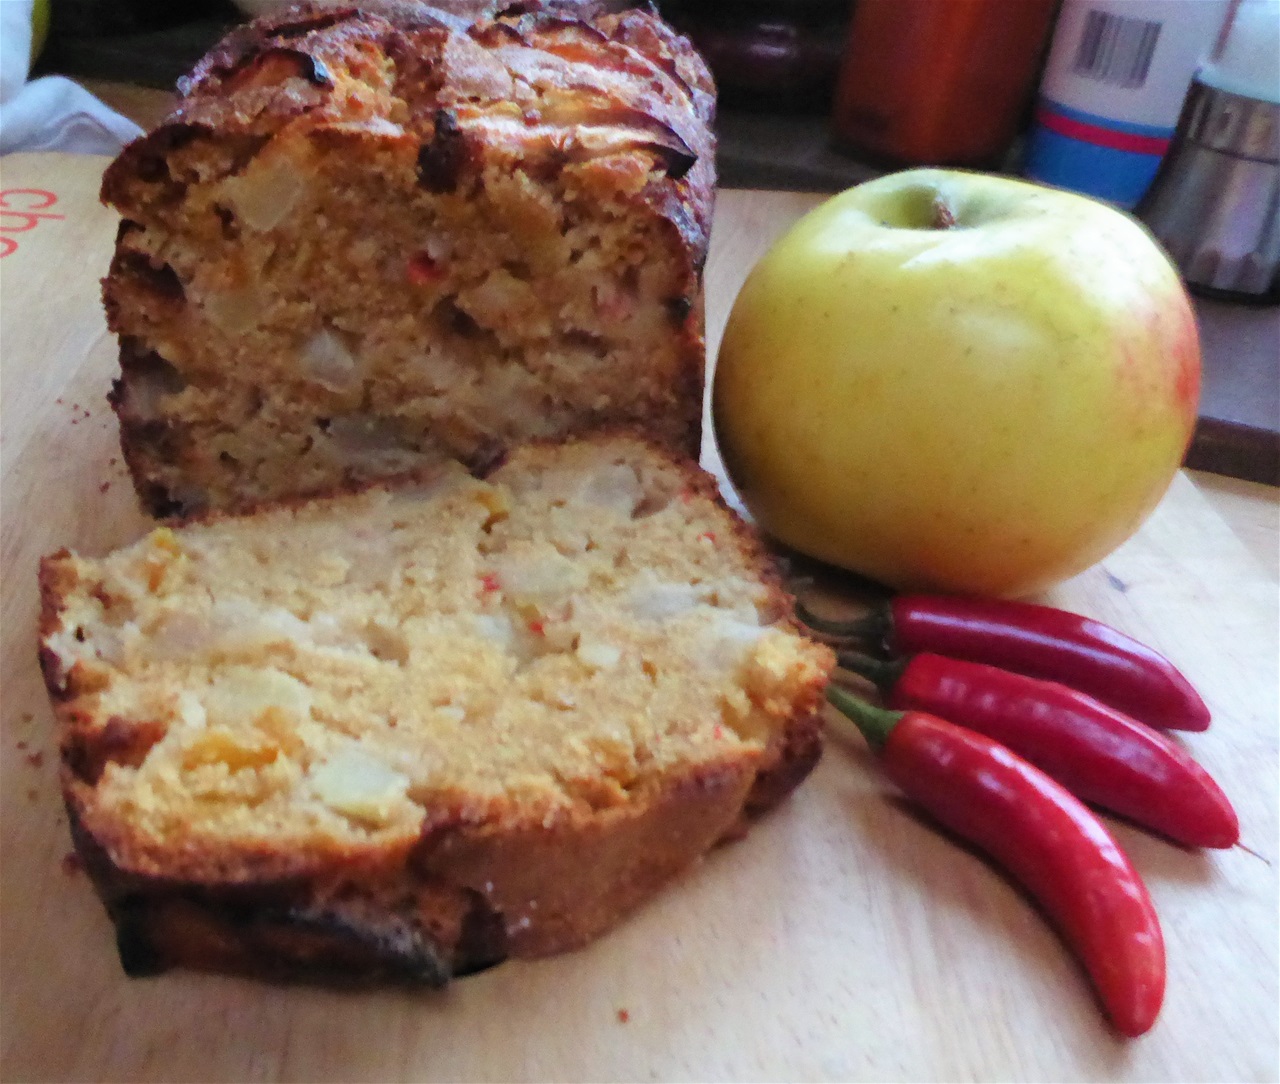
Apple & Chilli Cake
What you need:
200g self raising flour
1 level tsp baking powder
100g butter
100g soft brown sugar (White granulated would be fine)
75g candied chopped citrus peel
3 medium heat red chillies
2 Bramley apples
2 large eggs
50 ml milk
1 small eating apple
2 tsp white granulated sugar
½ tsp extra butter
What to do:
1. Preheat the oven to 160°C (fan) and line the cake tin. I used a loaf tin 20cm by 12cm
2. Weigh out the flour in a large mixing bowl, then rub in the butter
3. Add the baking powder, sugar and candied peel to the bowl
5. Take the seeds and membrane out of the chillies, chop them very finely and add to the dry ingredients
6. Peel the cooking apples and cut into small cubes about 1cm across. (It will not matter if these are bit uneven)
7. Put the chopped apple in the bowl and stir to combine everything evenly
8. Now add the eggs and milk, stirring to make a thick batter
9. Spoon the batter into the prepared tin
10. Slice the eating apple into even slices across the core ... no need to peel... flick out any seeds with the point of a knife, and lay the slices neatly on the top of the batter
11. Carefully sprinkle the granulated sugar over the apples and dot with the extra butter
12. Bake in the oven for 60 minutes, then test with a thin skewer to ensure there is no raw cake mix inside the cake You might get some apple on the skewer, so check carefully. If necessary, bake for a further 5 minutes
13. Cool on a wire rack for 15 minutes before tipping out of the tin
This is excellent warm with custard as a pudding, slightly warm and buttered, or sliced and eaten cold. As I said, more chilli would suit us next time around, but if you should overdo it, plain yoghourt would make a suitable accompaniment !
10th November 2018
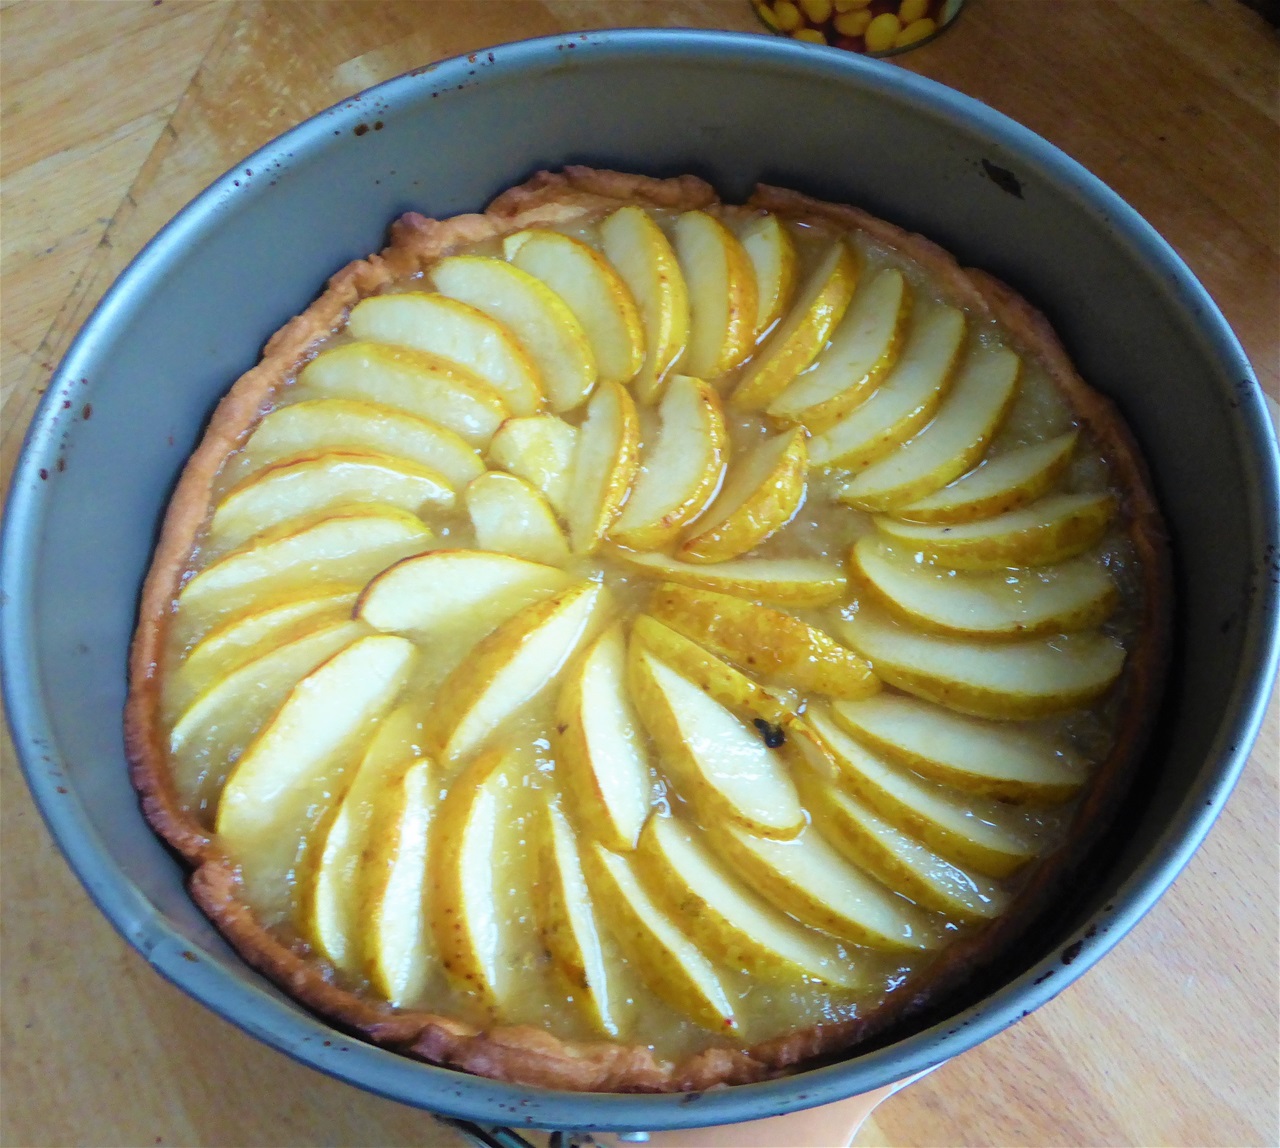
With rain hammering against the window, it is definitely a day for baking! I certainly didn't want to get soaked with a foray into the garage, where most of our stored harvests are kept, but with windfall apples in the basket in the kitchen, and ready made pastry in the fridge, the only decision to make was to choose between apple pie or apple tart. The tart won, so here is my version of
French Apple Tart
What you need:
6 apples (I used four cooking apples, plus two golden skinned eaters. You can use any combination you like, as ling as the apples for the filling will cook down into a sauce)
4 level tbsp sugar (I used a mix of white and golden caster sugar)
4 tbsp lemon juice
2 tbsp water
12.5 g of butter (easy to work out and cut off a block.. no need to get the scales out)
2 tbsp jelly or sieved jam for glazing. Traditionally aprocit is used but i neer have this, so today it was a Rhubarb & Apple jelly that was at the front in the cupboard
1 pack of ready made pastry... sweet or plain shortcrust
What to do:
1. Preheat the oven to 200°C and have your tin to hand .. a 10ins loose bottomed flan or cake tin. As you can see from the photo, I used a cake tin
2. Take your pastry out of the fridge now, or it will be difficult to unroll
3. Make the apple sauce filling: peel and chop the 4 cooking apples, and put in a pan with the water and 2tbsp of the lemon juice
4. Cook very gently, with the lid on, until soft enough to make a puree... 10-15 minutes.
5. Take off the heat, add the butter and 2tbsp of the sugar and stir hard with a wooden spoon until a smooth puree forms. Leave to one side to cool slightly
6. Now line your tin with pastry, allowing about 1.5-2 cm upstand to hold the filling later. If the tin is non-stick, you shoudn't need to grease or line it.
7. Prick the pastry base all over with a fork, put a cake liner paper over it, and up the sides a bit too, then fill with baking beans or dry rice (I have been using the same rice for years!) to a depth of 2cm, making sure it goes well into the corner so the pastry line between the bottom and side will be sharp. I( used a preformed 8 ins cake tin liner, re-shaping it to fit the larger tin)
8. Bake for 15 minutes, remove from the oven and take out the baking beans/rice, lifting them out carefully with the lining paper
9. Return the pastry base to the oven for another 5 minutes, when it should look a very light golden colour
10. Take it out and turn the oven down to 150°C
11. Prepare the apple topping: Without peeling, slice the apples into even slices about 2-3mm thick. Cut the apples through the core into quarters, remove the part core and then slice the apple flesh lengthways
12. Put the remaining 2 tbsp sugar and 2tbsp of lemon juice in a bowl, add the apple slices and sitr them gently so they are well covered with the mixture. You could add grated cinamon to them at this point if you like
13. Put 5-6 tbsp of apple puree into the pastry case, smoothing the top level. You may have some puree left over, but don't be tempted to make this layer too thick:
14. Now arrange the apple slices neatly on top the puree
15. Bake in the oven for 20 minutes, when the pastry edges shoud be browned. If not, bake for up to a further 5 minutes, before taking out of the oven
16. Warm the jam for the glaze in a microwave for 20 seconds, and gently brush it over the apples slices so they are all well covered
17. Leave to cool for 30 minutes before attempting to remove the tart from the tin. Standing it on a food can helps ease the edge ring down to release the tart.
You could add spices to the puree to vary the flavour if you like: cinnamon, nutmeg, allspice or cardamom would all be good.
The tart is nice slighty warm, but it much easier to cut when completely cold. You can serve it with icecream (Not here today, far too Autumnal!) creme fraiche, which cuts through the sweetness of the filling very well, or plain cream
October 2018
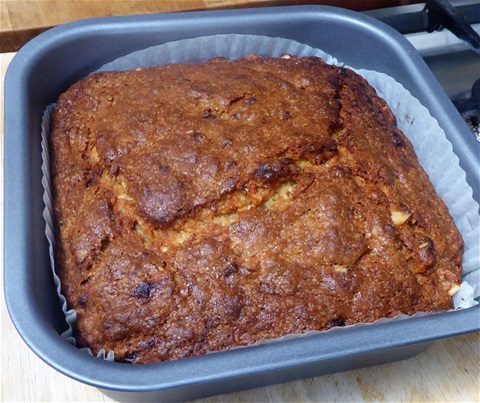
Banana Cake in the tin
30th October 2018
We often end up with bananas that have gone soft in the fruit bowl, and a quick, easy recipe for using them up is really helpful. I find that if I make a huge, loaf shaped cake, it takes ages to cook inside and the top is often rather darker than I'd like, so I played around with quantities and cooking time, to come up with one that cooks fairly quickly in a square tin, and is still deep enough to have a decent slice. I like the cake to taste of banana too, so have put in plenty of fruit. The nuts are optional: they could be substituted with chocolate nibs, or just left out altogether
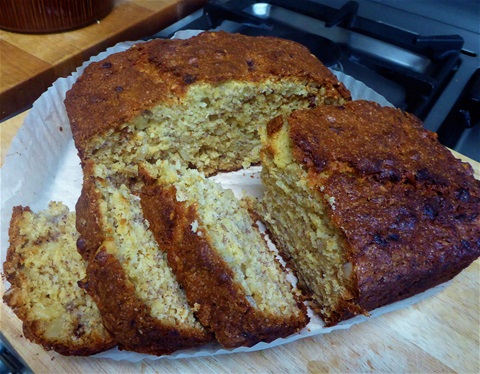
Sliced when warm, it is very crumbly
It was quite crumbly when warm, as you can see in the picture, but when it was completely cold it sliced beautifully and was very moist
I found that a 20cm round cake tin liner could easily be re-shaped to fit the square tin, which did away with all the greasing and flouring, or cutting up greaseproof paper to line the tin, and the cake just lifts straight out of the tin when it is coolled down a bit... excellent invention!
Banana Cake - (This amount fills a 20cm square tin)
What you need:
125g butter
280g self raising flour
½ tsp salt
½ tsp bicarbonate of soda (or baking powder if that is what you have)
280 g sugar (white granulated is fine, but you can use brown if you would rather)
50g chopped nuts (I used brazil nuts)
3 medium sized bananas, peeled and mashed thoroughly
2 large eggs, beaten together in a small bowl
1 tsp vanilla extract
What to do:
1. Heat the oven to 150C (fan).Put the butter in a small pan over a low heat. Take off the heat as soon as it has melted
2. In the meanwhile, weigh all the dry ingredients into a large mixing bowl, and stir to ensure the nuts are evenly distributed
3. Pour the beaten egg into the mashed bananas and mix well
4. Now stir in the melted butter and vanilla
5. Pour the wet ingredients into the dry ones, and mix thoroughly to ensure there are no dry patches of flour at all
6. Pour the cake batter into the prepared tin, smoothing the top with the back of a wet metal spoon if needed
7. Bake in the middle of the oven for 75 minutes. (Test with a skewer after 65 minutes)
8. Cool in the tin for 15 minutes before lifting it out
The cake is quite large, so I cut it in two and gave one half to our son's family. The remaining half is being gradually eaten by us, and after three days it is still moist and delicious, so I can honestly it does keep very well.
A good cake to bake for friends coming round for afternoon tea, or even to have as a hot pudding with custard when it first comes out of the oven
September 2018

Abi's Subzi
18th September 2018
This is one of the dishes cooked for our meal with our friend on Sunday, named by my husband. It is very adaptable, and so far each time he has cooked it, he has used a different combination of vegetables, all of which have been very tasty. The basic method is of course always the same, although you can vary the level of spiciness to suit your palate.
The amounts given are enough for four generous servings if there are two other dishes included in your meal, or two people who are very hungry. It can be served with either rice or roti (chapattis) and here we always serve it with a good blob of thick yoghourt, or fresh coriander and mint chutney.
This is a simple dish, with few spices, and so is ideal for anyone venturing into Indian-style cooking for the first time
Abi's Subzi
What you need:
1 medium sized onion
2 medium sized carrots
1 small/medium courgette - this one was yellow, but green is just fine
1 sweet red pepper
a handful of small cauliflower florets
a handful of french beans, cut into 1cm lengths, any colour
3 tbs sunflower oil
1 level tsp cumin seeds (jeera)
½ level tsp chilli powder, or two small medium heat chillies, chopped finely, either green or red
½ level tsp ground turmeric
½ level tsp salt, or to taste
What to do:
1. Peel and finely slice the onion. Start to fry gently in the oil
2. Peel and slice the carrots, cut each slice into quarters and boil for 5 minutes. Drain
3. Prepare all other vegetables, cutting them into similar sized pieces so they cook in the same time
4. Now the cumin seeds to the pan with the onions, which should be starting to go golden around the edges, and fry until they start to splutter or pop, then put in the turmeric and chilli, stir and cook for 30 seconds
5. Add the drained carrot pieces to the pan and cook with the onions for two or three minutes on a medium heat
6. Add the remaining vegetables, stir to mix the contents of the pan evenly. If it is very dry, add 3 tbsp cold water. Add the salt
7. Cover the pan and cook gently until the vegetables are cooked but not mushy, about 15 - 20 minutes. If it looks very dry, add another spoonful of cold water, but remember you are aiming to have vegetables that are moist but not swimming in sauce.
8. Ready to serve.
You can cook this up to a day ahead, as it reheats very successfully. It also freezes well, although vegetables like courgettes do then become very soft
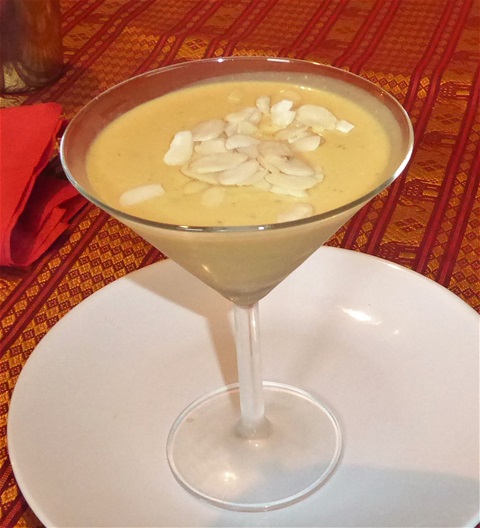
Mango & Lime Posset
17th September 2018
This weekend we had a visit from a friend we haven't seen for nearly 20 years, and so to follow our IndIan meal, I served a dessert that seemed suitably celebratory, based on a traditonal drink made of yoghourt, called Lassi. Mangoes and Limes are often used together to make refreshing desserts, but this Posset is more unctuous than refreshing, and very. very easy to eat indeed. It ideally needs to made the day before eating, so it can set in the fridge overnight, but if you can leave it for 8 or 9 hours it should be fine
Serving it in pretty glasses looks good, and makes it look very special
Mango & LIme Posset (serves 4)
What you need:
150g light brown soft sugar
Juice of 2 limes (save the zest for decoration) or 3 tbsp lime juice
300ml double cream
1tsp ground cardamom seeds
½ tsp ground cinnamon or 1 tsp rosewater
pinch of salt
flaked almonds for decoration, or dried rose petals
What to do:
1. Warm the sugar and lime juice together in a saucepan, stirring until sugar is completely dissolved. Turn off the heat
2. Pour the cream into another saucepan
3. Add the spices/rosewater and salt. Taste and add more if needed. Remember it is going to be added to the remaining ingredients so should not be too faint a flavour at this point
4. Bring the cream to the boil and pour in the lime juice and sugar syrup made previously. Turn off the heat
5. Combine the mango pulp and yoghourt together, and pour this into the warm cream. Mix together so the mixture is evenly coloured throughout
6. Leave to cool for 15 minutes
7. Put the mixture into a jug, then carefully pour into the serving glasses
8. Wipe any drips from the edges of the glasses, and carefully put them in the fridge overnight to set
9. Before serving, sprinkle the flaked almonds or rose petals on the top of each.
I hope you enjoy this as much as we did. This posset does keep in the fridge for two days, if it suits you to make it further in advance, but I owuld cover the tops with cling-film to ensure it is not affected by any other strong-smelling foods you may have there

Crispy Jalapeno & Spinach Pakoras
6th September 2018
Our Malabar Spinach plants are covered in succulent heart-shaped green leaves, and there is a bowlful of Jalapenos in the kitchen, mainly destined for pickles and jellies. This recipe combines the two in a way that should appeal to lots of people. It is easy to adjust the level of spiciness to suit your taste, or to double up the quantities to feed a larger group.
Other vegetables can be used, as long as they are not too juicy: onion makes a tasty addition, shaved pieces of carrot are good, grated radish or finely cut cabbage for example, anything that will cook quickly.
The corn flour is not traditional, but does give a crisper texture than gram flour alone (Gram flour is made from ground chickpeas)
Crispy Jalapeno and Malabar Spinach Pakoras (This makes about 12)
What you need:
15-20 Malabar spinach leaves (or a cupful of chopped Chard leaves or Perpetual Spinach)
3 jalapenos
1 medium-sized red pepper
1 cup of gram flour
1 tbsp corn flour
1/2 tsp chilli powder
1/2 tsp turmeric
1 level tsp salt (adjust to taste)
1 heaped tsp plain full fat yoghourt
Oil for frying (needs to be about 2cm deep in the pan)
What to do:
1. Wash and roughly chop the spinach leaves. Do not shake the water off them
2. Take the seeds out of the chillies and pepper, and chop into pieces about 0.5cm square
3. Put all the dry ingredients in a large mixing bowl, add the chopped vegetables and mix to combine
4. Using cold water (I needed 4 tbsp), make a very thick batter that will hold on the spoon without dropping
5. Heat the oil in the frying pan until hot, then turn down to medium heat. Carefully put flattish dollops of mixture into the oil, using two spoons. Depending on the size of your pan you should have 4 to six pakoras per batch, Make sure to leave space for turning them over.
6. Cook for 5 minutes on the first side, when they should be lightly golden on the bottom. Turn them, and llow a further 3-4 minutes cooking time when they will be pale gold all over, with no wet mixture inside.
7. Take them out of the oil and drain on kitchen paper. remove any left over pieces of batter from the pan
8. Now cook the second/ third batch in the same way.
9. Remember to turn the heat off under the oil when you have finished. When cold, this can be strained to use again
These are easy to eat warm, when they are very crisp. As they cool they become slightly softer, but are equally tasty. I serve these with a plain yoghourt and mint dip, and some sweet chilli dipping sauce, but to be honest they are perfectly good just on their own, as a snack or perhaps a light first course to an Indian-style meal.
You can refresh them in the oven if you need to: 10 minutes on 200C
August 2016
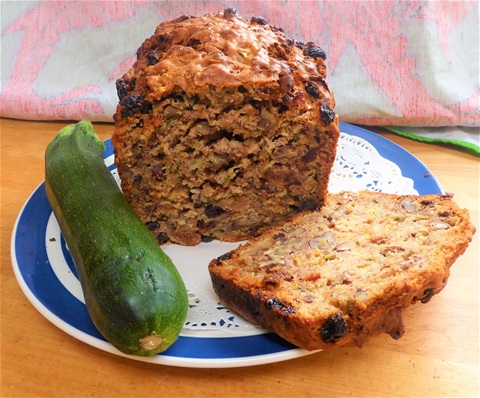
Fruit & Nut Loaf with Courgettes
13th August 2018
Courgettes are still a regular harvest here, so anything that uses a reasonable amount of them is always worth considering. This cake is moist and delicious, as well as being very easy to make, and quite versatile, s several ingredients can be varied according to what you have in the cupboard at the time
Don't worry that the mixture seems very dry as you strat to combine the wet and dry ingredients, as the courgettes provide plenty of moisture and all will be well
Fruit & Nut Loaf, with Courgettes : makes one 2lb loaf shaped cake
What you need:
300g self raising flour
1 level tsp baking powder
2 tsp powdered cinnamon
pinch of salt
140g dried fruit ( i used some leftover mixed fruit from Christmas, but use what you have)
handful of nuts, roughly chopped (I used pecans as that is what I had in the cupboard, but any shelled unsalted nuts will be fine)
2 large eggs
125ml sunflower oil
1tsp vanilla extract
85g soft light brown sugar (white granulated can be used; gives a different flavour)
350g grated courgette (No need to peel)
What to do:
1. Line the tin and heat the oven to 170C
2. Combine all the dry ingredients except the sugar, in a large mixing bowl, including the fruit and nuts and the grated courgette. Mix evenly
3. In a measuring jug, whisk together the sugar, oil and eggs until creamy
4. Pour the liquid into the dry ingredients in the mixing bowl, and using a large spoon, mix them together so there is no dry flour visible
5. Spoon carefully into the tin, smooth the top with the back of a wet spoon
6. Bake for 1hour 10 minutes, then test with a skewer to check the inside is cooked. if not, bake for a further ten minutes
7. Cool for 15 minutes and then tip out of the tin and remove the paper before leaving on a wire rack to cool. Do not try to slice until it is almost cool or it will crumble
This is really nice with butter on it. Any left over cake will keep in a tin for up to 3 days, but it really is easy eating so it may not last that long!
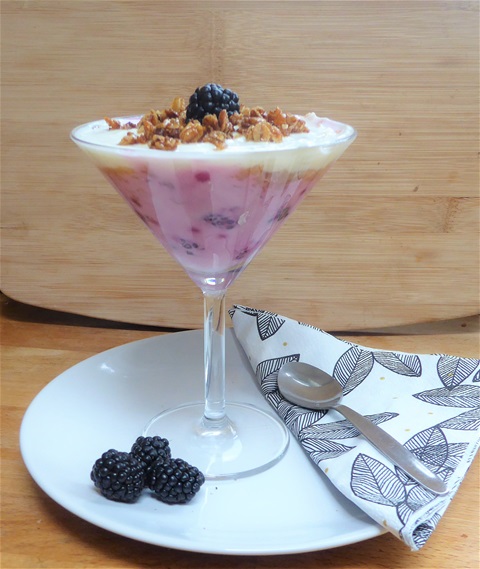
Blackberry & Apple Cranachan
10th August 2018
Blackberries are ripening very early this year, and despite the extended hot, dry weather, are as fat and juicy as usual. With it being so hot, I tried to think of a way of serving the classic blackberries and apple in a cool, creamy way, and came up with this, which is loosely based on a Scottish dish of cream topped with toasted oatmeal.
These quantities make enough for four well-filled cocktail glasses, but you can use any suitable containers of about 175ml volume, or indeed make one large pudding
Blackberry & Apple Cranachan
What you need:
4 tbsp oats
2 tsp of butter-based cooking spread. The added butter gives a good flavour but you can use an olive oil based one if that is what you have to hand
2 tbsp runny honey
0.5 tsp ground cinnamon
1 cupful of blackberries
2tbps white granulated sugar
1 450g tub of very thick Greek-style yoghourt (I used a vanilla flavoured one)
1 capful of whisky (You can omit this if you prefer)
4 medium sized eating apples, peeled and grated
2tsp butter-based spread (a second lot)
3 tbsp light brown soft sugar
What to do:
1. Lightly toast the oats in a dry pan until they start to smell cooked. Add the butter spread and mix evenly, then the honey.
2. Turn out onto a lightly oiled plate, sprinkle evenly with the cinnamon and leave to cool
3. Rinse the blackberries, put three to one side for a garnish,and put the remainder in a small saucepan. Heat gently until the juice starts to run and add the white sugar, stirring gently to dissolve. Do not break up the berries. Leave to cool until just warm
4. Put the grated apple in the same pan used for the oats, with the second lot of butter spread and cook gently until golden in colour. Tip out onto a small plate,divide into four portions and allow to cool
5. Put the yoghourt in a small bowl, keeping back 4 heaped tablespoonsful,mix in the whisky, beating ensure the yoghourt is smooth. Use a slotted spoon to add the blackberries, leaving most of the juice in the pan. Stir in lightly
6. Crush the cooled oats and ensure there are no large lumps
7. Now assemble the pudding: Put a quarter of the blackberry-yoghourt into each glass, add a portion of apples (this will be a thin layer) and thn top with the reserved yoghourt. Sprinkle on a quarter of the toasted oats and add oen of the reserved blackberries
8. Keep in the frdige for an hour before serving. (Overnight is fine)
Once you have made this and seen how easy it is, you can come up with all sorts of variations: raspberry with dark chocolate ganache & toasted coconut, strawberries with white chocolate & pistachio, pear & ginger, with gingernut topping,, and so on. The key I think is to have layers that are quite sweet, but the main body to still have a touch of sharpness to it, plus a topping with a contrasting texture. This crunch could be provided through serving with small shortbread biscuits or something similar, whatever takes your fancy
July 2018
9th July 2018
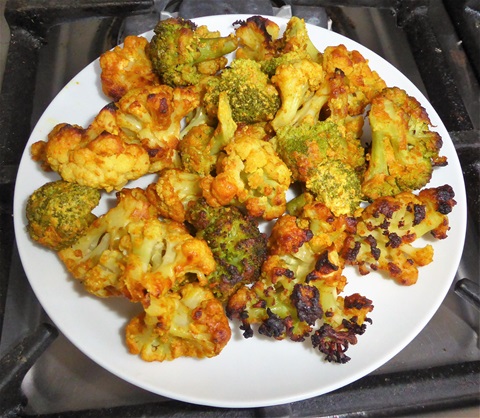
Never had a glut of cauliflowers before! Lots are being blanched and frozen, but thought I'd try something new. Cauliflower goes well in curry, is really good roasted so I wondered about grilling it. Found a recipe originally from Gunpowder, and Indian Restaurant in London, which I made into this. It ended up a tad spicier than I had intended, so ate it alongside some cooling plain yoghourt, but I offer here the quantities I used, which you can easily adjust if you prefer your food less spicy
We ate it alongside a beef curry and plain parathas (with the aforementioned yoghourt in my case) but it could equally well accompany dhall and rice or, with toothpicks availabe, a "nibble" with drinks
Mustardy Grilled Cauliflower (Serves 2-3 as a side dish)
What you need:
1 small head of cauliflower
½ cup thick Greek-style yoghourt
2 heaped tsp ready made English Mustard
½ tsp chilli powder (adjust to reduce/increase spiciness)
1 tsp ground cumin
1 tsp ground turmeric
½ tsp salt
1 tbsp sunflower oil
What to do:
1. Pre heat the grill. Line the grill pan with foil and oil the rack lightly
2. Make the marinade: Mix all ingredients excepting the cauliflower in a bowl
3. Prepare the cauliflower: break into florets about 2cm across, cut any thicker stems in half to ensure they cook through
4. Blanch cauliflower in boiling water for three minutes. Drain and dry in a tea towel
5. Put cauliflower in the marinade and stir around to cover it all.
6. Put the marinade-covered cauliflower on the grill rack and grill for about 10 minutes, turning at least once. There should be slightly charred pices but mainly golden brown. Test with the point of aknife to make sure the stems are cooked through
I had a small amount of calabrese so added this in and it worked well. The original recipe used broccoli, so you could experiment with this if you like the overall flavour.
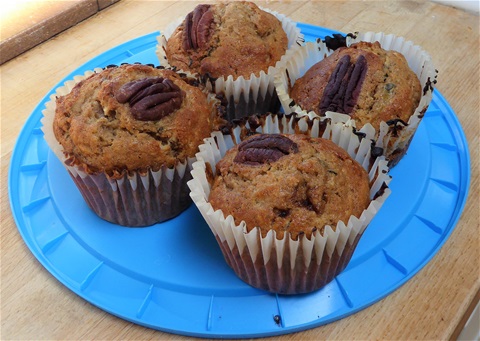
Courgette & Pecan Muffins
9th July 2018
Harvesting courgettes is now a daily event, and I am disguising a few from time to time, hence these muffins, which I made on Sunday with the assistance of my five year old granddaughter. I tried to make the recipe as easy to follow as possible so that she can make them again at home with a little bit of help, if she'd like to
Courgette & Pecan Muffins (makes 12 large ones)
What you need:
320g self raising flour
100g cold butter cut into small pieces
1 heaped tsp baking powder
200g caster sugar
60g dark brown sugar
1 heaped tsp powdered cinnamon
1 heaped tsp ground nutmeg
pinch of salt
200g grated courgette
100g chopped pecan nuts, plus 12 whole ones (You can use walnuts instead)
60ml milk
2 medium eggs
1 tsp vanilla extract
What to do:
1. Turn on oven to 180°C and plut muffin cases in a deep muffin tin (12)
2. Weigh the flour into your mixing bowl and rub in the butter until it looks like bread crumbs
3. Add the spices, salt, baking powder and both sugars and mix thoroughly
4. Now put in the grated courgette and chopped nuts and mix until there is no dry flour at the bottom of the bowl
5. Pour the milk into a measuring jug, add the vanilla extract and both eggs and mix up until it is creamy
6. Pour the liquid from the jug into the mixing bowl and roughly incorporate it... don't worry if it looks a little bit runny at this stage
8. Share out the batter between the 12 muffin cases, and put a pecan nut onto the top of each
9. Put in the oven for 20 minutes, when the tops should be lightly browned and they feel springy to touch
10 Cool for five minutes, then lift out of the tin and leave on a wire rack to cool.. they are very good slightly warm
You can keep these in a tin for a day or two if they are not all going to be eaten straight away
Even Better If:
You press the nut lightly into the batter so it stays in place as the muffin rises.
You avoid dripping the batter onto the edges of the paper cases, as it burns a little bit when the muffins are in the oven
But they taste delicious!!
June 2018
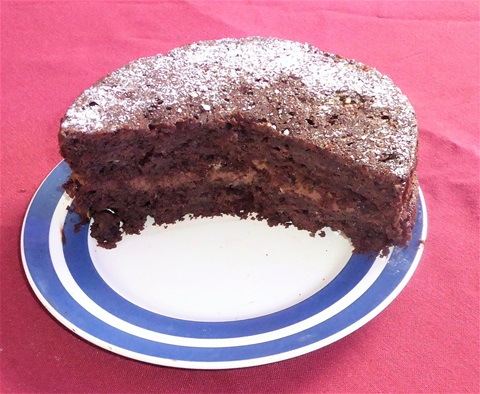
Chocolate Orange Fudge Cake
24th June 2018
As the courgette plants are now upping production, it seems a good time to start using them as a "hidden ingredient" before the cries of "Not courgettes again!" begin. This cake was very well received yesterday (No-one could spot any courgette) and I shall certainly be making another one very soon.
It is definitely fudgy and if you would like to increase the orange flavour you could use some chocolate orange to make the filling, in place of plain chocolate
Chocolate Orange Fudge Cake (with Courgettes)
What you need:
115g butter
250 g caster sugar
300g self raising flour
1 level tsp baking powder
pinch of salt
60g cocoa powder
2 large eggs, beaten in a small bowl
125 ml sunflower oil
125 ml full fat, plain Greek yoghourt
1 tsp vanilla extract
2 unpeeled grated courgettes ( Iused ones about 15-18cm long)
zest of one large orange (You can double this to increase the orange flavour)
60 g chopped dark chocolate (or choc chips)
For the ganache filling:
30g butter
100 g dark chocolate
60ml double cream
To finish:
dusting of icing sugar
What to do:
1. Line two 20 cm sandwich tins with baking paper (I have the equivalent size of what looks like giant cupcake cases bought in our local supermarket, which makes this job a cinch) Preheat the oven to 160°C
2. Either by hand or in a mixer, blend the butter and sugar together until pale
3. Now add the oil, beaten eggs, yoghourt and vanilla extract to the butter and sugar; mix until evenly combined
4. In a large bowl, combine the flour, baking powder, salt and cocoa
5. Using your hands, evenly mix in the orange zest, chopped chocolate and grated courgette into the flour etc
6. Pour the liquid from the mixer bowl into the dry mix, and stir together with a wooden spoon until there is no dry flour to be seen. Do not over mix, as this affects the texture of the finished cake: similar to making muffins
7. Divide the mixture evenly between the two prepared tins, using the back of a wet spoon to gently smooth the tops
8 Bake in the centre of the oven for 45-50 minutes, until a thin skewer poked into a cake comes out clean of uncooked mixture
9. Leave to cool for 10 minutes in the tins, before putting them on a wire rack and removing the lining paper Leave until completely cold before filling
10. Make the gananche filling: Melt the butter and chocolate together in a small saucepan, over a very gentle heat. Take off the stove and leave to cool for 10 minutes
11. Stir in the cream, half at a time, until the filling is evenly coloured and thick. If it is too thick to spread, add a little more cream until it is the right consistency
12. When the cakes are cold, spread the ganache onto the bottom cake, turn to top cake over so that flat bottom is uppermost, and sit it onto the filling. This gives you a flat top to the finished cake, but if you would rather it was slightly domed instead, just don't reverse the top one
13. Dust the top surface lightly with icing sugar
You can of course make extra ganache and use this to cover the top of the cake, and with added chocolate curls could look just wonderful. However, it was plenty rich enough for us with just the filling.
Omitting the orange completely and filling the cake with cherry jam and whipped cream makes a version of Black Forest Gateau.. with added courgettes of course. Worth a thought!

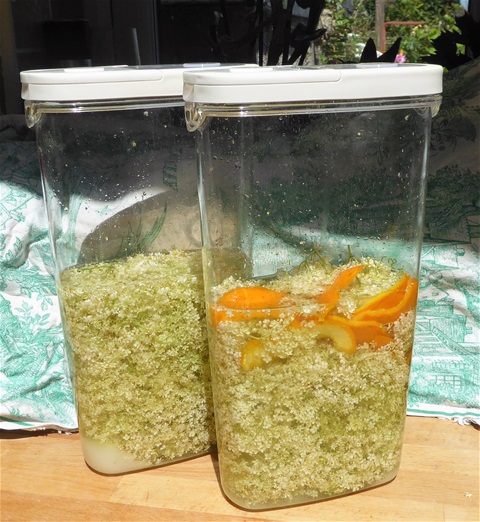
Elderflowers freshly picked
14th June 2018
In this area, Elderflowers are now out and it is time to make one of our seasonal favourites: Elderflower GIn. Last year I also made some with orange peel, and the two flavours went really well with the juniper backround of the gin, so this year I have put up a litre of each. The best time to pick elderflowers is when they are warm and dry, with the pollen still on them. I cut the heads straight into into a large glass bowl so that precious pollen is not lost
You will also need a large lidded container to steep the flowers in the gin. A Kilner jar is perfect, but this year mine are all still full of other goodies, so I pressed some plastic boxes into service. The lids of these are not water-tight, so I stir rather than shake them every day. Don't use a bottle, as it is very difficult to get the flowers ect out again at the end of the process
Elderflower & Orange Gin (makes 1 litre but easy to scale down for a 70cl bottle)
What you need:
1l of gin (I used a "value" brand
20-25 heads of elderflowers
Peel of two large oranges, washed and peel taken off in strips with a potato peeler, avoiding the white pith as far as possible. (Omit this for Elderflower GIn)
5 tbsp white granulated sugar
What to do:
1. Using scissors, cut off all the green stems from the heads of flowers, letting them fall into a second glass bowl. A few small pieces of fine green stalks are Ok, but lots will give a different flavour
2. Put the stems in the compost, then carefully swill the bowls out with some of the gin to gather all the fallen pollen, and then pour the gin into your jar
3. Add the orange peel and sugar, and either shake wll or stirr to dissolve as much of the sugar as you can.
4. Shake or stir every day for a week: this will dissolve any remaining sugar
Elderflower Gin and Elderflower & Orange Gin
5. Strain out the flowers and peel (which you can discard) I use a fine hairsieve, but you can leave it to drip through musin overnight if you prefer. Do not squeeze the muslin bag though as it will make your gin slightly cloudy.
6.Pour into bottles,seal and label
The bottled gin will keep for a very long time, although it may not last a very long time once you have tasted it!
This same method can be used to make differently flavoured gins or other spirits too. Strawberry Vodka is an excellent one for Summer time. Raspberries, Blackcurrants and Blackberries are good to use, and in a couple of weeks' time I shall be trying redcurrants too
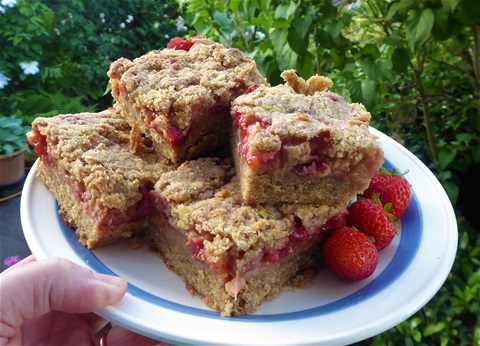
Rhubarb & Strawberry Slices
12th June 2018
We have quite a modest strawberry harvest this year, and lots of the berries are slightly misshapen as a result of imperfect pollination, so are best served chopped up. Strawberries and rhubarb are a classic combination, and often I have made the two into a crumble, which makes the best of odd-shaped berries, but I this time I wanted to make something that would keep for a few days, to avoid us having to eat vast quantities of crumble... there are only two of us to feed at home right now!! This was the outcome. I was a bit impatient cutting it up, so the edges are a little ragged, so I advise you to wait until it is completely cold before slicing it if you want nice neat-looking pieces. Having said that it is really nice warm too, but is easily reheated in the oven
Rhubarb & Strawberry Slices (makes 12-15 pieces)
What you need:
3 cups plain flour
225g butter, slightly softened
1 cup granulated sugar
1 heaped tsp baking powder
1 heaped tsp ground cinnamon1 large egg
1 tbsp cold water
2 cups of strawberries and 2 cups of rhubarb, cut into cubes, roughly ½ cm in size
2 more cups of granulated sugar for the fruit
1 level tbsp cornflour
What to do:
1. Turn the oven on to 175C and line a baking tine (13cm x 9cm) with baking paper (I find that a few little dobs of butter in the base of the tin helps secure it), folding it neatly into the corners. Leave enough paper sticking up to use to lift the cold slice out in one piece
2. Prepare the fruit and put in a bowl with the sugar and cornflour and mix evenly. Put to one side
3. Put the plain flour in a large bowl and rub in the butter until it is like rough breadcrumbs
4. Add the sugar, baking powder and cinnamon and mix evenly. Add the egg and water, and combine into a dryish,crumble-like mix which does not come together into a ball. Take out one cupful and keep aside
5. Tip the rest of the flour and butter mix into the tin, spread evenly, and firm it down well with the back of a large spoon. If it sticks to the spoon, wet it first
6. Pour the fruit evenly over the base, and scatter the reserved cupful of crumble over th top, pressing it down gently
7. Bake for 45 minutes, when the fruit will be bubbling and jammy and the top will be golden brown
8. LEAVE UNTIL COLD!!!
9.Once it is completely cold, use the excess paper to lif the whole slab out of the tin and onto a chopping board. With a large, sharp smooth bladed knife, cut the slab into squares /rectangles of a suitable size
These are very moreish, but do keep for at least three days in a cake tin. They are ideal to take with a picnic lunch, as a snack with a cup of coffee,or warmed in the oven, served with pouring cream or icecream.
Having made these, I think the strawberries and rhubarb could be replaced with raspberries, or blackcurrants even with a little more sugar. With both of these fruit swelling nicely in our fruit cage, I shall be finding out I think!
May 2018

Elderflower & Lemon Cupcakes
22nd May 2018
Last week's bakes to share with friends were Elderflower & Lemon cupcakes, with nod to the Royal Wedding Cake of the same flavour. Don't let the inclusion of oats in the ingredients put you off, as they are not at all porridgey in texture. The original recipe came from Claire Jessiman for Lemon & Elderflower Drizzle Muffins, although I felt these ones are more like cupcakes than the tall, risen muffins I am used to baking
Elderflower & Lemon Cup Cakes
What you need:
For the cakes -
200g plain flour
3 tsp baking powder
75g golden caster sugar
0.5 tsp salt
50g oats
1 large egg
200ml milk
90ml sunflower oil
1 lemon, zest and juice (25ml)
25ml elderflower cordial
For the drizzle -
1 lemon, zest & juice (25ml)
30 ml elderflower cordial
30ml water
75g golden caster sugar
What to do:
1. Turn the oven on to 190C, and put 12 paper muffin cases in a muffin tin
2. Put the flour, baking powder, sugar, salt and oats in a large bowl and mix through evenly
3. In a separate small bowl or jug, mix together all the liquid ingredients and pour into the dry mixture and stir to combine. No need to beat, just stir
4. Spoon the batter equally into the 12 cases and bake for 20 minutes, when they should be golden brown and spring back slightly if the top is gently pushed
5. While the cakes are cooking, make the drizzle, by warming all the ingredients in a small saucepan, stirring to ensure the sugar is fully dissolved, Set aside until the cakes are cooked
6. While the cakes are still warm, poke 7 or 8 holes in each using a toothpick or thin skewer, going almost to the bottom of each cake
7. Carefully pour a tablespoonful of drizzle over each cake, then leave to cool.
You can add decorations to the top - quarters of candied lemon slices or fresh lemon zest for example, or leave them unadorned to show off their glossy tops, as I did
The cakes keep very well in a tin, staying beautifully moist
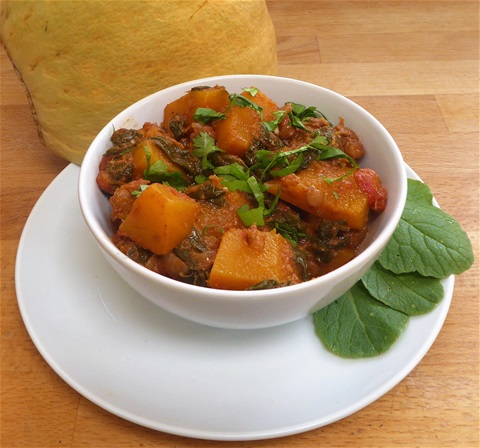
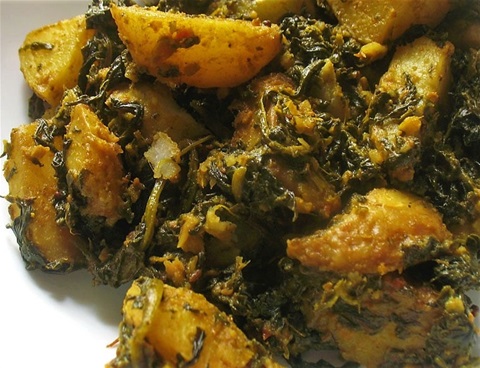
Squash & Spinach Curry
18th May 2018
With several Winter Squashes still in our store, as well as an ample supply of spinach from the well-named Perpetual Spinach, this recipe was perfect for them. Some lentils for protein and it made a healthy vegetarian meal, which also would be suitable for anyone following a vegan diet. For the meat eaters of the world, it is a delicious side dish! I used tinned lentils because we had these already, but if you wish to use fresh ones, cook them first, as the cooking time is insufficient for any except the small pinkish orange ones. You can of course omit them completely, or substitute chickpeas.
These quantities make enough for six people as a main meal. I froze away several portions in food boxes for days when an extra dish might be needed, clearly labelled though... I alway think I shall remember what is in the freezer, but somehow this never works, and I end up with those mystery items which are never used
Squash & Spinach Curry
What you need
Squash - (I used Ute Indian; any dense, orange fleshed one like Butternut is suitable. Peel and cut into 3cm cubes 650-675g)
300g spinach, washed and roughly chopped
1 medium onion, peeled and sliced finely
1 sweet pepper, cut into small pieces (I used a red one but green is good too)
1 400g tin of lentils, drained and rinsed
1 400g tin of tomatoes, or fresh ones chopped
3 heaped tsp prepared garlic, either fresh or from a jar
3 heaped tsp prepared ginger, as above
3 tsp ground cumin
3 tsp ground coriander
1 tsp chili powder (reduce to half if you prefer a mild taste)
6 tbsp sunflower or vegetable oil
4 tbsp coconut milk
2 tbsp lemon juice
big handful of fresh coriander leaves, rinsed and chopped
salt & black pepper to taste
What to do:
1. Gently fry the onions until beginning to turn golden around the edges
2. Add the garlic, ginger, ground cumin, coriander and chilli powder. Stir and fry until spices start to smell frangrant
3. Put in the squash and turn the cubes in the spice mixture until they are coated. Cook for five minutes on a low heat, turning occasionally to ensure nothing burns
4. Add the tomatoes, coconut milk and diced pepper, mixing together with the squash. Rinse the tomato tin out with a splash of water and add this too. Add salt and ground black pepper to taste Cook, covered, for 10 minutes, then uncovered for a further 10 minutes, until the squash is softened, stirring as the sauce thickens to ensure it does not stick
5. Stir in the lentils, add the spinach and cover. Cook gently for five minutes, then uncover and stir to mix evenly
6. Add the lemon juice, and stir in the chopped coriander leaves.
If you are cooking this ahead of your meal, keep back to coriander leaves and stir in just before serving. If you have frozen some, adding fresh coriander before serving lifts the flavour
You can adjust the thickeness of the sauce according to how this will be served: thicker sauce is better with roti or parathas, whereas rice needs a thinner sauce

Blueberry Muffins (There were six to start with!)
12th May 2018
This is the time in the year where I sort through the freezer, to see if there are any forgotten bags of fruit or veg I froze last season, to prolong the times we can eat "home grown". Trouble is, often these have got a bit squashed, well, at least in our freezer they do, so here is a quick and easy way to use up some of that sorry-for-itself frozen fruit.
As there are only two of us to feed right now, I thought a recipe for a smaller quantity of muffins might be welcomed by some of you so, and as you know, I like recipes you can just make quickly in one bowl. So... here, making six big fat ones, is my recipe for
Frozen Fruit Muffins ( I used blueberries)
What you need: (I use a 235-240 ml cup)
a cupful of frozen fruit (No need to thaw, but it must be separated, not in one big block)
1½ cups self raising flour
1 level tsp baking powder
3/4 cup granulated sugar
1/3 cup vegetable or sunflower oil
1 large egg
1/3 cup milk
1tsp vanilla extract
What to do:
1. Heat the oven to 200°C and put six large muffin cases in a deep tin
2. Put the flour, baking powder and sugar in a large bowl and mix together evenly
3. In a small bowl, mix together all the liquid ingredients ... egg, oil, milk & vanilla
4. Pour the liquid into the flour etc and roughly mix with a palette knife or large fork.
5. Add the blueberries and combine until there is no dry flour. Do not overmix, a bit lumpy is fine
6. Spoon equal quantities of the mix into the six muffin cases
7. Back for 20 minutes, check with a cocktail stick or thin bladed knife to see if the muffins are cooked through. If not, cook for a further 4 minutes
8. Once cool enough to handle, put the muffins i(n their cases), onto a rack to cool
These will keep for three days in a sealed tin. You can add extra sugar as a topping before baking if you like, almost any fruit can be used in place of blueberries, as long as it is in similar sized pieces, and alternative flavourings can be used in place of vanilla: almond extract, a level tsp of cinnamon or mixed spice, grated lemon or orange rind etc
PS For anyone who remembers my quick muffin recipe from before, you can see that using the right depth of tin makes all the difference to how they come out!!
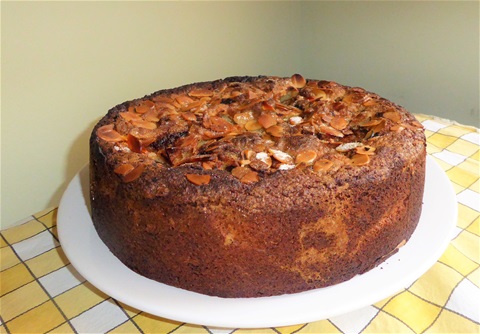
Rhubarb & Almond Cake
8th May 2018
This season I have been exploring new ways to use our rhubarb, and saw a Sainsbury's recipe for a cake with almonds. It seemed to have a lot of rhubarb in it though, which I thought might give a wetter end result than I was looking for, and I really needed to make a larger cake than the recipe would give.
A combination of having no light in the oven so I could not easily see the whole cake without taking it out, and wanting to make sure that the larger quantity of batter was cooked through, meant the back of the cake was much darker than I intended... "a bit burnt" was how one of our grandchildren described it, but with some judicious trimming as it was served, it was all eaten
So here then is the recipe I finally used with the baking time duly adjusted so I shall know exactly how long it needs to stay in the oven next time!
Rhubarb & Almond Cake
What you need:
225g butter
225g caster sugar, and 3tbsp for topping
3 eggs ( I used large ones)
zest of two medium sized oranges
150g self raising flour
1½ tsp baking powder
300g ground almonds
450g rhubarb, cut into 4cm pieces, thicker stalks sliced in half or quarters so they are roughly equal thickness
3tbsp flaked almonds
What to do:
1. Grease and line a 25cm loose bottomed cake tin and tunr oven on to 160°C
2. Put the butter in the bowl of your mixer, soften in the microwave if needed, then add suagr and mix until pale and fluffy
3. Add eggs one at a time, mixing each one in until incorporated
4. Add ground almonds and orange zest, mixing until combined
5. Add the flour and baking powder, and mix until smooth, scraping down from the sides of the bowl as needed. The batter will be quite stiff
6. Spoon half the batter into, spreading it evenly. Arrange half the rhubarb evenly over the mixture, keeping the pieces 1cm from the edge
7. Put the remaining cake mix over the rhubarb, smoothing the top with the back of a wet tablespoon
8. Push the other rhubarb half into the batter, making a neat circular design, keepign the same 1cm distance from the edge
9. Scatter the flaked almonds evenly over the cake, pressing them down lighly and sprinkling with the 3 tbsp of sugar
10. Bake in the middle of the oven for 1hr, when it should be light golden brown, then loosely cover with foil for a further 20 minutes. The centre of the cake should feel firm to touch
11. Remove from the oven and cool for at least 30 minutes in the tin.
This is really good served either warm or cold, with pouring cream. It will keep in a tin for three or four days if you have any left over. The texture is very moist and with this amount of rhubarb not in the slightest soggy, and of course if you have a pretty pink version of rhubarb, will look stunning. As you can see, ours is a more greeny red one!
April 2018

Leek Quiche with Parmesan Crust
27th April 2018
The slow start to Spring this year has meant our leeks are still good to eat, So I have been trying to think of different ways to use them, other than our "go to" Leeks in Cheesy Sauce. I haven't made a quiche for ages, and so a leek quiche was on the menu. My recent discovery of smoked turkey rashers in our local shop give it some extra flavour, and the parmesan pastry worked well too.
Most of you have probably made quiche before, but I am mainly adding this recipe for my own sake, as I can never remember the proportions for making this amount of shortcrust pastry
I hope you like the sound of it though!
Leek Quiche with Parmesan Crust (Serves 4-6 depending on portion size)
What you need:
200g plain flour
40g finely grated parmesan
75g cold butter, cut into small pieces
1 egg
pinch of salt
cold water
5 medium sized leeks, cut to leave about an inch of green, and then sliced about 2mm thick
2tbsp olive oil
200ml single cream (or creme fraiche)
4 eggs (I used large ones as that is what I had to hand)
150g smoked turkey slices, cut into pieces about 1cm square
several good grinds of black pepper
pinch of dried thyme
½ tsp grated nutmeg
What to do:
1. Turn on the oven to 200 °C and lightly butter a deep 25 cm loose-bottomed cake or quiche tin
2. Put the flour in a large bowl, and rub in the butter until the mixture resembles breadcrumbs. Stir in the parmesan
3. Add the egg, mix with a broad-bladed knife and add cold water, bringing the mixture together to form a ball (I used 4-5tbsp)
4. Leave the ball of pastry in the bowl, cover with a damp tea towel and put in the fridge for half an hour (longer is fine)
5. Gently cook the leeks in the oil until just beginning to turn golden at the edges. Take off the heat, add the turkey, thyme, pepper and nutmeg; stir to combine. Put to one side
6. In another bowl, whisk together the eggs and cream until smooth.
7. After half an hour, take the pastry out of the fridge and roll out to a disc 30cm in diameter (My pastry mat has rings of different diameters marked on it, which makes this easy)
8. Using the rolling pin to drape and lift the pastry, carefully line the tin. A small piece of pastry helps push it right into the join between the sides and the bottom. It should reach to the top of the sides; if there is any surplus this can be cut off before serving, or left for a more "rustic" look
9. Prick the bottom with a fork, line with baking pachment and pour rice or baking beans in to a depth of about 1cm (I use the same rice over and over again, keeping it in a little bag in the drawer in between uses)
10. Bake for 20 minutes until golden brown. Take out of the oven and remove the rice and paper
11. Combine the leek mixture with the eggs and cream
12. Carefully fill the pastry case to within half a centimetre of the top
13. Bake for 30 minutes until set in the middle
14 Leave to cool for 10 minutes before easing the quiche out of the tin. Standing it on something like a can of beans makes it easier to lower the side ring of the tin.
Omitting to parmesan is OK, and any grated hard cheese can be added to the filling, with or without the turkey. Ham can be substituted for the turkey of course, but if you are going to use bacon, you will need to cook it first
TIP: If the dreaded "soggy bottom" results, stand the quiche on a dry non-stick frying pan and cook the bottom of the pastry for about ten minutes on a medium heat, and it will be beautifully crisp and golden
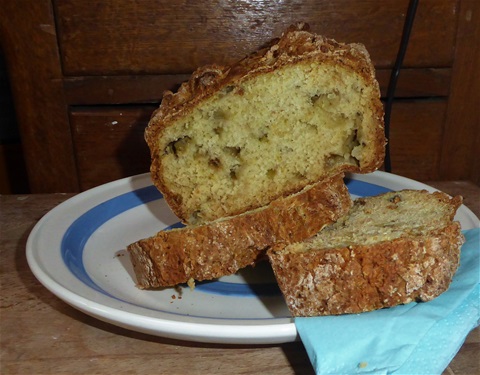
Rhubarb & Ginger Soda Bread
25th April 2018
With this season's rhubarb harvest well underway, I was looking round for new ideas on how to use some of it and found this recipe from Jack Monroe (Cooking on a Bootstrap) and decided to give it a go. It is very straightforward and very delicious. I used a 2lb loaf tin to bake the dough in, because I wanted to be able to slice it, but I have baked soda bread as a round "blob" on a baking tray and it has been just fine, so if you don't have a tin....
Rhubarb & Ginger Soda Bread
What you need:
200ml milk
2tbsp lemon juice
300g plain flour
1 heaped tsp baking powder
1 tbs sugar (I used white granulated)
100g rhubarb, sliced as thinly as you can but no thicker than a £1 coin
A piece of fresh ginger about 3cm by 2cm (or that volume grated from a larger piece)
4 tbsp cold water
1tsp salt ... not in original recipe but we felt it improved the flavour
What to do:
1. Heat the oven to 200°C and dust your tin or baking sheet lightly with flour
2. With the milk still in the measuring jug, add the lemon juice, stir and leave to rest for a few minutes until it is curdled (Don't let this put you off, it does not smell and takes the place of the traditional buttermilk used in soda bread)
3. Put the flour in a large mixing bowl with the baking powder, salt and sugar, and stir to mix evenly
4. Add the milk mixture and stir with a pallet knife or similar (I prefer this to a wooden spoon, but a spoon would do the job of course)
5. Put in the rhubarb and grate in the ginger (I didn't peel it)
6. Add the cold water and mix in. You should have a soft dough that you can bring together with your hands to leave the bowl clean around it. Add more water or another tablespoonful of flour as needed
7. Shape the dough either to fit your tin, or into a ball to flatten slightly on the baking sheet
8. Slash the top with a sharp knife (Jack reminds us that this is done to "Let the Fairies out"... the choice is yours)
9. Bake for 40 minutes until golden brown and crusty on top
10. Turn out of the tin to cool on a wire rack
As well as being really tasty slightly warm still from the oven with plenty of butter, I found out this morning that it also makes very good toast!
PS Our rhubard is green inside, but a pink one would look very prettty
March 2018

Hot Cross Bun Pudding
31st March 2018
Sometimes you find you have over bought on Hot Cross Buns, and they go a bit stale. Toasting them can be precarious with all the dried fruit and sugar in them, and we have had several charcoaled offering recently. Years back I made a bread-and-butter pudding with brioche, so I thought one using Hot Cross Buns might be a good pudding for our family meal tomorrow, Easter Sunday. It doesn't take long to put together, and will reheat* well, so making it ahead of time is an option. This quantity should serve about 8 people. I am unsure as we haven't eaten it yet, but I am not expecting leftovers
Hot Cross Bun Bread-and -Butter Pudding
What you need:
8 Hot Cross Buns
30g butter
150g marzipan, cut into 0.5cm cubes
350ml milk
2 large eggs
25g white granulated sugar
1tsp vanilla extract
1 tsp grated nutmeg, with a little more at the end
What to do:
1. Turn on the oven, 160C
2. Lightly butter the dish
3. Slice each bun into three slices crosswise and butter each piece
4.Fit the slices into the buttered dish, keeping the top crusts for the upper layer, adding the marzipan cubes evenly between the slices
5. Mix the eggs and milk together evenly, and then stir in the vanilla, sugar and nutmeg
6. Pour gently over the buns in the dish, squashing them down a little bit with the back of a fork to soak up the custard mix
7. Sprinkle with a little extra sugar if you like, and grate some nutmeg over the top of the pudding
8. Leave for half an hour (longer is fine) to allow more of the custard to soak into the buns
9. Put in the pre-heated oven for 30 minutes if you re going to re-heat before eating, or 35 minutes if eating straight away
Serve warm,with cream, custard or icecream. The marzipan melts slightly, and gives a festive feel to the pudding, a bit like the marzipan in a Simnel Cake
*Re-heat at 160C for 20-25 minutes
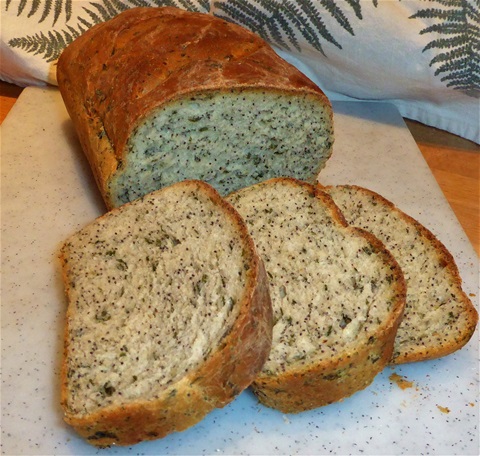
Spinach & Poppy Seed Bread with garlic
6th March 2018
I managed to find time today to make the "experimental" bread I have been thinking about for the last couple of weeks. Last Spring I made some bread with a kind of stuffing of Wild Garlic leaves, which led me to think about using Spinach in bread, but maybe in the dough rather than as a stuffing. Here is the recipe I ended up with today, which is straightforward enough, but you do need to allow time for proving. It made one large loaf and a fairly small one. Again, I have used cup measures, which means I don't have to get out the scales
Spinach & Poppy Seed Bread with Garlic
What you need:
large bunch of spinach (I used Perpetual Spinach), with the thick stems removed
a small head of garlic -- use less if you feel this is too much for your taste
3.5 cups of strong white bread flour, plus some for kneading
1.25 cups of warm water
2 tsp of dried yeast (This was one 7g packet)
pinch of salt
0.25 cup of poppy seeds
2tbsp olive or vegetable oil
What to do:
1. Break the garlic head into cloves and roast until soft. Leave to cool and then squeeze out the garlic paste
2. Blanch the spinach for one minute, drain really well and chop finely. Spread it out to cool, squeezing any remaining water out
3. Put the flour in a large bowl, and add the yeast on one edge and the salt on the opposite edge (if they mix at this stage the yeast dies off before doing its work)
4. Put in the spinach, garlic, poppy seeds, oil and warm water. Mix with flat bladed knife or a spatula until there is no loose flour in the bowl
5 Turn out onto a silicon sheet or your work top, and knead, stretching the dough thoroughly, for ten minutes. When it is too sticky to work, sprinkle some extra flour over the dough
6. Put into an oiled bowl, and turn the dough to coat all sides lightly with oil
7. Cover with a damp teatowel and leave in a warm place until doubled in size. Today this took just over an hour, but if your kitchen is on the cool side, it may take twice this time.
8. Take the dough out of the bowl and push it back down again to the original size. You should not need to add any flour at this stage
9. Lightly oil a 2lb loaf tin
10. Stretch out the dough into a flattish shape, then fold one third inwards lengthways and cover with the remaining two thirds and turn so the seam is underneath before putting it in the tin
11. Use a sharp knife to slash the top diagnonally five or six times
12. Leave covered with a damp teatowel until double the size again: today this took 45 minutes. In the meanwhile preheat the oven to 200°C
13. Bake in the centre of the oven for 45 minutes. Test the bread is cooked by tipping it out of the tin and knocking on the bottom, which should sound hollow. You can always put it back in the oven for a little longer if you need to
14. Leave to cool on a wire rack for around an hour before slicing. It will still be warm but does not crush down when cut
We ate half our loaf buttered, with a chicken, leek and mushroom casserole, but I am sure it will be really good toasted too! The bread was very light and only slightly garlicky... it could take more without making the dough too wet I think
Now that I have made this version, I can see all sorts of ways to vary it... grated parmesan instead of poppy seeds perhaps, ground fennel seeds and chopped feta, using half parsley and half spinach.... lots of possibilities!
February 2018
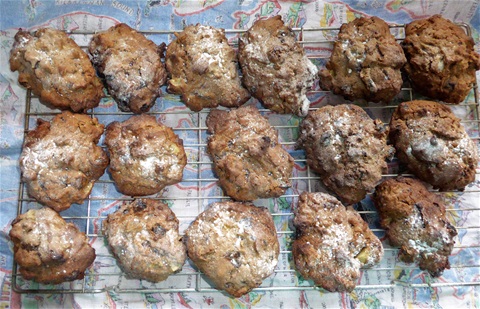
Pear & Walnut Rock Cakes
27th February 2018
Freezing cold weather always makes me turn to comfort food, and the smell of baking is always welcome. Did you ever make rock cakes at school? I remember them being rock hard alright, but loved the flavour. I've tried to come up with a version easier on the teeth, including some of our favourite ingredients. I hope you enjoy them. Another "cup" measured recipe, with a cup being 235-240ml...makes life very easy
Pear & Walnut Rock Cakes (makes about 15)
What you need:
½ cup softened butter
1½ cups brown sugar
1 egg
1 tsp vanilla essence
2 cups plain flour
1½ tsp baking powder
1 level tsp powdered ginger
1 level tsp ground cinnamon
½ cup chopped walnuts
½ cup sultanas or raisins
1 large pear, peeled, cored and chopped inot pieces about 0.5 cm cubes
2 tbps milk
What to do:
1. Heat the oven to 175C and line two large baking tray with silicon sheets or nonstick baking paper
2. Beat together the softened butter and sugar until it is smooth
3. Stir in the egg and vanilla essence
4. Mix in the flour, baking powder, spices and milk. The mixture should be fairly stiff but with no loose flour, so if necessary add another spoonful of milk
5. Mix in the nuts, dried fruit and pear
6. Put heaped tablespoons of mixture about 6cm apart on the trays, making 15 or 16 in all
7. Bake for 17 minutes, until golden brown and still slightly soft when pressed in the middle
8. Remove from the sheet using a spatula and cool on a wire rack.
9. Dust very lightly with icing sugar, if you like
These keep for a day or two in a tin, but they are indeed very easy to eat, especially slightly warm, as you watch the snowflakes swirling outside the window.
The recipe is easily varied to use apple instead of pear, different nuts, white sugar instead of brown, currants instead of other dried fruit. A version with chopped dried figs and candied orange peel is good too. In fact, for most of us, I reckon there would be ingredients in the cupboard to bake a batch of these if you were snowed in for days....
Cabbage & Coconut Curry
3rd February 2018
This week I cut the last few of our cabbages as the outside leaves were beginning to discolour, and I didn't want them to rot. That means of course that we now have several large and luscious cabbages, so need to find interesting ways to eat them!
This recipe is one I haven't cooked for ages. You know how you just forget about things you made regularly for years, but it suddenly came to mind ... and here it is, last night's dinner!
Cabbage and Coconut Curry (4 servings)
What you need:
1 medium sized onion, peeled and sliced
1 smallish cabbage,finely sliced: I used a savoy, and it came out at six cups, loosely packed
2 long thin green chillies, finely sliced, seeds included (take out the seeds to reduce the heat)
1 level tbsp mustard seeds
3 heaped tsp fennel seeds
2 tsp minced garlic
3tsp minced ginger
1 tsp turmeric
1tbsp lemon juice
salt to taste
2 tbsp vegetable oil or ghee
1½ cups of dessicated coconut (unsweetened)
What to do:
1. Put the sliced onion in a non-stick frying pan (one with a lid) and cook gently until just beginning to colour
2. Add the mustard seeds, and as soon as they start to pop, put in the garlic and ginger and cook for one minute
3. Put in the turmeric and fennel seeds, about 50ml water and the lemon juice. Stir to mix
4. Put in the cabbage, chillies and coconut. Mix with the ingredients in the pan, adding more water if it is a bit dry
5. Put the lid on the pan, and simmer gently for 4 minutes until the cabbage is softened. Keep an eye on it so it does not burn at the bottom, although a small amount of colour adds flavour. If necessary, add more water a splash at a time. There should be no free liquid left at the end of cooking.
6. Add salt to taste and stir
Last night we had this with beef madras, but it is good served on its own wth plain rotis (chapatis), plain yoghourt and some spicy pickle, ganished with coriander leaves. It is easy to vary the spices: cumin seed instead of fennel for example. Caraway seeds are a good pairing with cabbage too. A fresh green chutney with mint, coriander leaves and some extra green chilli alongside is another delicious combination. (It re-heats very successfully)
I used pre-prepared ginger and garlic, and dessicated coconut, but fresh ingredients are of course very good: just get them all ready before you start to cook. Freshly grated coconut has a wonderful flavour. I have also used frozen grated coconut too
January 2018
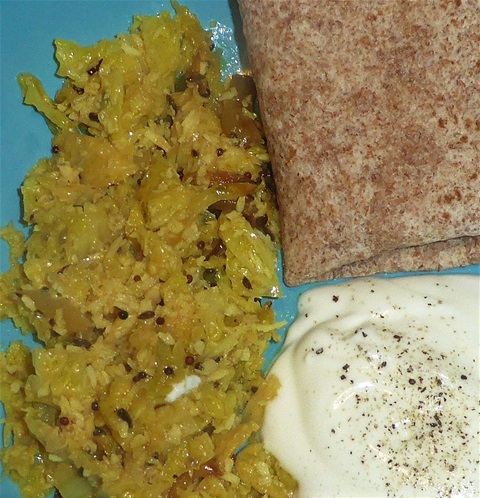
Saag Aloo
29th January 2018
With potatoes still in store, and several spinach-type leaves being harvested, this recipe makes good use of both! We used a mixture of perpetual spinach, mustard greens and komatsu, but you could use frozen spinach instead
Potato & Spinach Curry (Saag Aloo) (serves 4 as a side dish)
What you need:
2 large potatoes, peeled and cut into 4cm dice or pieces
1 medium onion, peeled and sliced
1tbp vegetable oil or ghee
1tsp each garlic puree and ginger puree (from scratch, ready prepared in jars, or frozen)
1 green chilli, finely chopped (or chilli powder to taste)
½ tsp cumin seeds
1tsp black onion seeds (kalonji)
1tbsp water
½ tsp turmeric
salt to taste
about 300g spinach leaves, washed,stalks removed and cut into small pieces
½ tsp garam masala (optional)
What to do:
1. Par-boil cut potatoes for about 8-10 minutes until almost cooked, and drain them. Leave them with some texture so they don't fall apart later
2.Gently fry the oil in the oil, ideally in a non-stick frying pan,until just beginning to colour around the edges
3. Add the garlic and ginger and fry until beginning to brown
4. Add the cumin and kalonji seeds. Cook until seeds start to smell fragrant, then stir in the chopped chilli
5. Put in 1tbsp water, then the turmeric and mix evenly
6. Add salt to taste, then the potatoes,. Stir gently to mix and ensure potatoes are fully covered in the spice mix. Add another spoonful of water if it is too thick to mix
7. Now add the spinach and cover the pan for 5 minutes on a low heat. the spinach will then have wilted and be easier to mix evenly with the potato. Add another spoonful of water if needed. Test that the potatoes are cooked through by pokin them with a fork
8. Sprinkle the garam masala if using, before serving
Adding a cupful of peas or chickpeas provides extra protein to make this a nutritious main meal. We enjoy it with plain yoghourt and chapatis, slightly thinned with some more water accompanied with plain rice, or as a side dish with a meat-based curry.
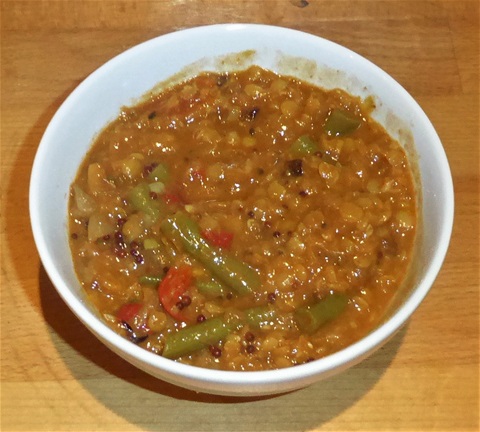
Dhall with vegetables
13th January 2018
After Christmas I crave simple comfort food, and dhall ticks all the boxes. This is one I made with some vegetables in it, which made it even tastier and nutritious. With a dollop of plain yoghourt and a couple of chappatis or some rice, what's not to like? There is no soaking needed as these lentils cook so quickly. Using ready made garlic & ginger puree speeded things up too: we buy large jars of this from a local shop and it is an excellent stand by
Do not be put off by the long list of ingredients: I have tried to write them in more or less the order they are needed, which should help if you have never cooked anything like this before
Dhall with Vegetables (Makes 2-3 generous servings)
What you need:
1½ cups of split red lentils (split moog dhall)
½ tsp ground turmeric
3 medium onions sliced finely
pinch of salt
1tbsp vegetable oil
2 tbps ghee (or use extra oil)
1 heaped tsp garlic puree
2 heaped tsp ginger puree
1tsp whole black peppercorns
2tsp fennel seeds
1tsp fenugreek (methi) seeds
1 tbps black mustard seeds
1tsp ground coriander
1 tsp chilli flakes or powder, according to your own taste
chopped tomato, either 6 cherry ones or 2 medium ones
1tbsp tomato puree
1 cup of french beans cut into 3cm pieces (fresh or frozen)
½ cup chopped coriander leaves
salt to taste
What to do:
1. Rinse the dhall, making sure any tiny stones are removed, and put in a saucepan with enough water to cover by about 8-10 cm. Add the turmeric, bring to the boil and simmer for 15 minutes
2. While the dhall is cooking, gently fry the sliced onions in the oil and ghee, with a pinch of salt to help them brown.
3. While you are waiting for the onion to brown, grind the fenugreek, fennel and black pepper together in a pestle and mortar
4. Once the onion is brown around the edges, add the mustard seeds, cooking until they start to pop, then put in the garlic and ginger purees (careful, it might spit) and stir to mix.
5. Add the spices you have just ground, plus the ground coriander and chilli powder/flakes and stir to mix. Cook for three minutes, adding water a splash at a time if needed, so they don't stick and burn.
6. Add the chopped tomatoes and tomato puree (In the Summer when tomatoes have more flavour, you can omit the puree) and cook slowly until their juices are released.
7. Add enough water to give about 3cm in the pan, and put in the green beans. Cover and cook for 6 minutes for fresh, 3 for frozen beans. Turn off the heat
8. If there is any foam on the dhall, skim this off and test to ensure they are soft. There should be very little water left by now
9. Bring the onion/bean mix to a rapid boil and pour into the dhall, stirring to mix
10. Taste and add salt as needed
11. Stir in chopped coriander leaves just before serving
Dhall sits quite happily on the stove top until you are ready to serve, it keeps in the fridge in a covered dish for two or three days and freezes superbly. I usually make extra for another day, as it is easy to increase the quantities, and the cooking time remains about the same
You can add any vegetables you like: cooked carrots are good, as is spinach, either fresh or frozen in cubes. I have also used left over cooked potato sometimes.
I hope you enjoy this as much as we do
John
That Blackberry Cranachan was delicious!
Kathy
Thanks John. The strawberry version had Strawberry Gin in it in place of the whisky... just a dessertspoonful between the four portions
Carol Farrar
The courgette & pecan muffins are fab. Can't keep up with demand.!!!
Kathy
Glad you like them... you could try sultanas in place of the nuts if you like, with cardamom in place of other spices
shaheen
The mustard cauliflower recipe looks delicious. i am bookmarking to make it in the very near future.
Kathy
Thanks you for saying so Phuong.. hope you enjoy them when the day comes your crops are ready for the job!
Phuong
Oh wow. Your curries look amazing. I'm looking forward to trying the winter squash one as well as the potato and spinach curry.
Kathy
Glad you are enjoying these John!
John
Really enjoy your recipes, very easy to follow.That dhall and vegetable dish from January is delicious... comfort food on a cold evening, even if it is May now.