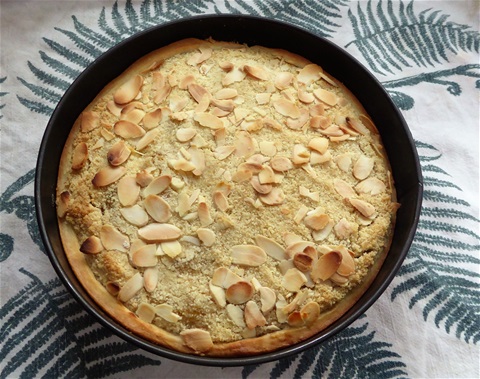
Mince Pie with Almond Crumble Topping and Satsumas
24th December 2017
Suddenly realising there was no festive pudding for Christmas Lunch tomorrow, I resuscitated a recipe for something I used to make for my Dad. It smells glorious so hopefully tomorrow will be met with approval by his grandson and family!
Mince Pie with Almond Crumble Topping and Satsumas
What you need:
1 jar of mincemeat (I used one from the local supermarket)
1 tin of satsumas in juice, drained (If you use fresh ones, you need to take the membrane off each segment)
1 packet of ready made pastry, ideally sweet crust ... I did say I was in a quandary
50 g plain flour
50g cold butter cut into small pieces
3 heaped tbsp ground almonds
1tsp almond extract
3 heaped tbs golden demerera sugar
a scattering of flaked almonds, or granualted sugar if you have none
Butter to grease the tin
What to do:
1.Turn on the oven to 180°C
2. Lightly grease a loose bottom 10 ins cake tin, or flan tin
3. Cut a circle of pastry to fit insode the tin with an upstand of about 1.5cm
4. Spread the minecemeat evenly on the pastry and lay the satsumas evenly on top
5. Make the topping: blitz the butter and flour together in a food processor (or rub in by hand), add the ground almonds, sugar and almond extract and blitz again until fine crumbs... this takes about 30 seconds
6. Carefully add the topping to the pie and scatter the ground almonds evenly over the top. Press down lightly with the palm of your hand
7. Bake for 25 minutes. Cool in the tin
8. Remove the pie from the tin by standing the base on a tin of beans or something similar.
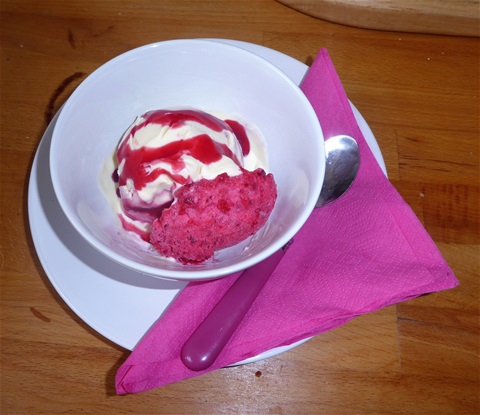
My Dad always loved this with tinned cream, the kind you have to shake in the tin until it is almost solid, but I am serving it tomorrow with a choice of double cream or indian kulfi (Ice cream) My Mum would have wanted custard made with Bird's custard powder... I probably still have some in the cupboard somewhere!
The pie reheats very well, or can be served cold if you prefer
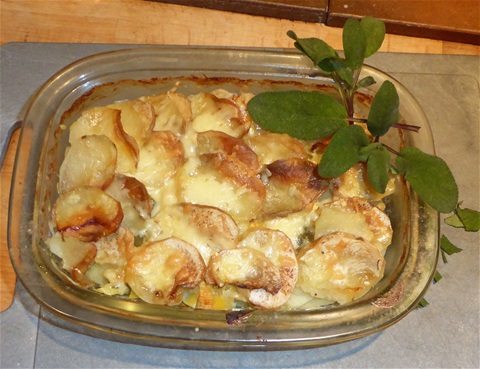
18th December 2017
Another potato dish, this time a hearty, oven baked one, just right to accompany sausages! It gets its name from a traditional dish cooked in France, where the heat of the oven in the village bakeries is used after the bread has been cooked, to bake this.. Boulangerie is of course the french name for a bakery. The original version used onions, rather than leeks, and I have added cheese, which I don't think would have actually been included in the original recipe but certainly tasted good!
Potato and Leek Boulangere (This gave two large portions and would really have been enough for three servings... it is easy to adjust the quantities
What you need:
5 medium sized potatoes, peeled and cut into slices 1-2mm thick. A mandolin helps, but I cut them by hand and it wasn't too difficult
3-4 leeks, depending on size, finely sliced and divided into rings
3 cupsful of grated cheese (I used cheddar this time but i have used caerphilly before too)
12-15 sage leaves, rolled and cut into fine ribbons
3 level tps coarse-ground black pepper
seasalt to taste
100ml hot vegetable stock ... can be from a cube, but check the salt content
Butter to grease dish .. an over proof dish (no lid needed). I used a pyrex one about 18cm by12cm and 6cm deep
What to do:
1. Preheat the oven to 160°C
2. Lightly butter the dish
3. Overlap potato slices to form a layer at the bottom of the dish (expect to make 4 or 5 layers)
4.Add a third of the leeks, plus half a cup of cheese and a quarter of the sage leaves. Season with pepper, and salt to taste
5. Repeat twice more, leaving enough potatoes and sage for a top layer, together with half a cup of grated cheese
6. Add the top layer of potatoes, and carefully pour in the stock... it should come just over half way up the dish
8. Bake in the bottom of the oven for 75 minutes
9. Sprinkle the remaining cheese & sage leaves over the part cooked potatoes, and return to the oven for a further half hour
I used waxy salad potatoes, so the finished dish had clearly separate pieces of potato through it, but using a floury variety makes the result softer overall. You can use different herbs: thyme is good with the leeks for example, or marjoram also works well. It depends on what you intend the dish to accompany really.

Old-fashioned Potato Cakes like my Mum's
14th November 2017
Last time we had mashed potatoes, Abi was disappointed there was not enough left for me to make potato cakes, so this week I made sure I cooked some extra!! The method is one my Mum used to use, although she usually cooked hers in lard or clarified dripping, whereas I prefer sunflower oil these days
Old-fashioned Potato Cakes like my Mum's (This made six)
What you need:
Cold mashed potato.. I had 1½ cupsful of potato mashed with butter and parsley. Just make sure it is not sloppy though
2tbs plain flour
pinch of salt
1 medium sized egg
Sunflower oil to cook: 0.5 cm deep in pan
What to do:
1. Put the potato in a bow and re-mash, to loose it a bit.
2. Add the flour and salt, and mix in evenly
3. Add the egg and incorporate to make a stiffish dough
4. Break the dough into six equal balls, and flatten them gently until they are just about 1cm thick in the middle.
5. Heat the oil in a non-stick pan and cook three patties at a time on a gentle heat, 4 minutes each side. They should be pale golden brown
6. Drain on kitchen paper before serving. If you are making a large batch, keep them warm in the oven as they are much tastier like this
We had ours with a fried egg and a blob of brown sauce, but they are very versatile to be honest. You could add herbs to flavour them further of course, or grated cheese (a small handful of well flavoured cheese in this amount of potato would be about right)
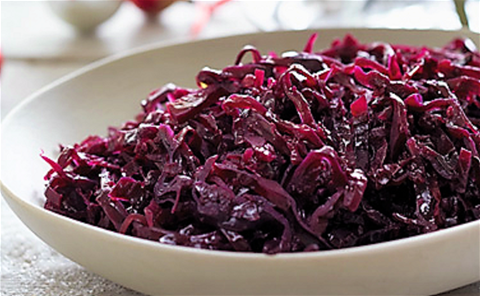
Braised red cabbage ready to serve
13th November 2017
This year we have grown some nice neat red cabbages, and one of our all-time favourite ways to eat them is braised with apples and spices. It really is a cold-weather dish, and often features in Christmas Dinner too. It freezes extremely well, reheating with no loss of flavour, so if you wanted to get ahead you could cook two.. one for now and one for later on...
Braised Red Cabbage with Apples and Spices
What you need: (This amount is enough for 4 servings, and is easy to adjust up or down: cooking time is the same really)
3 cups of sliced red cabbage, with thick veins removed
1 large onion, finely sliced
1 large eating apple, peeled and cut into ½ cm dice
4 cloves of garlic, peeled and very finely cut up
½ tsp ground cloves
1 level tsp salt
½ tsp ground black peppercorns
1 level tsp ground cinnamon
1 level tsp ground nutmeg
1/4 cup light brown sugar
1/2 cup red wine vinegar
knob of butter
What to do:
1. Turn on oven to 150°C
2, Mix the onion, garlic and apple together in a small bowl
3. Mix the ground spices, salt and sugar in another bowl
2. Put a layer of cabbage in the bottom of an ovenproof dish, ideally one with a lid. You are going to need four layers of cabbage so judge the amount accordingly
3. Add a layer of apple, onion and garlic (You will need three layers altogether) then sprinkle over a third of the sugar and spice mix
4. Repeat twice more, then top with a layer of chopped cabbage
5. Carefully pour over the red wine vinegar, then put small dobs of butter on top of the cabbage
6. Cover tightly with foil, and put on the lid, if you have one
7. Bake for 2- 2½ hours.
Be careful when you take the foil off as steam will escape and could burn you. The cabbage will stay warm with the closed dish covered with a folded teatowel, or sitting in the bottom of the oven. We ate it last night to accompany a abeef & mushroom pie and mashed potato: it is also excellent with sausages
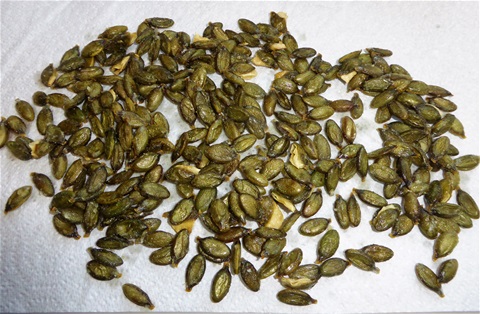
Roasted Naked Pumpkin Seeds (This is not all of them!)
8th November 2017
Last year, for the first time, we grew a variety of pumpkin with naked seeds, one which has no hard seed coat, and they were so delicious we just ate them raw. This year I roasted some, and they were very more-ish indeed. Well worth the small effort, and it meant they could be stored for a while too. To be honest, they only lasted a few days, as they were in a dish out on the worktop, so grazing was far too easy!
The recipe itself is very basic, but I am adding it to my list so this time next year I can quickly check how long to roast them for
Roasted Naked Pumpkin Seeds (Pepitas)
What you need:
As many seeds as you have available, cleaned of orange flesh, rinsed and roughly dried (I had 2 cupsful from one pumpkin, but less is fine)
4 tsp fine ground salt
2tbs olive oil
What to do:
1. Pre-heat the oven to 140°C and line two trays with non-stick baking paper or silicon sheet
2. Put the dried seeds in a bowl, add the salt and oil, mix well with your hands.
3. Spread in an even layer on the trays and put in the oven for 25 minutes
4. They will be slightly crisped when done... careful, they are very hot so do not burn your mouth!
5. Allow to cool and store in an airtight jar
If you would like to add spices, ½tsp of your choice is sufficient. Ras el Hanout is very nice, as is plain chilli
NB If you want to roast seeds that have a hull on them ie "normal" pumkin seeds, it does take a bit longer, up to 35 minutes. One tip to get the salty flavour inside is to boil the seeds in salted water for 10 minutes before roasting them. Small seeds can be eaten whole but if you ahve massive Winter Squash seeds, it is easy to peel these before you eat them
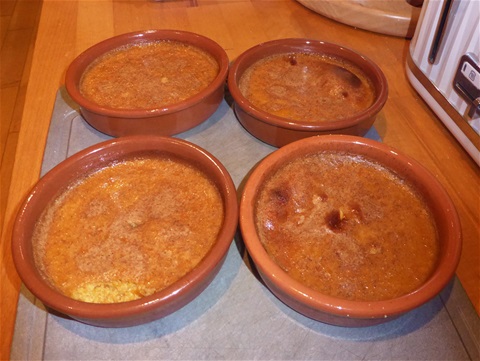
Butternut Maple Custards
23rd October 2017
I have never made a sweet dish with squash of any kind, but was intrigued by this recipe, which is based on one from Dave in the US. It turned out to be really luscious. It could have done with being in slightly deeper dishes, but I used what I had: 11-15 minutes less cooking time would have allowed them to set with a "wobble", but we liked them anyway!
Butternut Maple Custards (This amount made 4, of about 175ml each)
What you need:
3/4 cup milk
2 eggs
1/4 cup maple syrup (The real deal gives the best flavour)
1/2 cup plain butternut puree (see below for how to make this)
1 tsp ground cinnamon
1tsp ground ginger
1/2 tsp vanilla extract
pinch of salt
nutmeg to grate over to taste
What to do:
1. Making the puree: Cut the butternut in half and lay face down on an oiled tray. Bake for 45 minutes on 180°C. When flesh is soft, scoop out the seeds and remove the skin. Mash up the pulp until smooth. Leave to cool a bit
2. Turn the oven down a smidgeon to 170°C, and have to hand a deep roasting tray large enough to acommodate your four custard dishes. Fill the kettle and put on to boil
3.Heat the milk until steaming but not boiling
4. In a large bowl, whisk together the syrup and eggs until smooth, then slowly, a bit at a time, whisk in the warm milk. Do not put it all in at once or the eggs may scramble and cook
5. Add cinnamon, ginger, vanilla and salt, with the squash puree, whisking until smooth
6. Divide evenly between the four dishes, and carefully put them in the roasting tray
7. Pour boiling water into the tray until it is half way up your dishes
8. Carefully put the tray in the oven, without getting any water in your dishes. Bake for 45 minutes (If you have shallow dishes, check after 35 minutes: the custard should wobble a bit in the middle. Mine was a bit over set, but still delicious... Dave commented that the custard should reach at least 70°C)
9 Take the tray out of the oven and remove the dishes. Leave them to cool for half an hour before chilling in the fridge for an hour
I used a very small butternut which gave just the right amount of puree, but if yours is large, you can either only cook a part of it, or puree the whole thing. Extra puree can be frozen very successfully to use for muffins, bread, sweet pies... or more custards. If you don't have butternut, any squash could be used, but the best results come from one with very dense flesh
PS Made some more this week and reduced the cooking time to 30 minutes, which gave excellent results
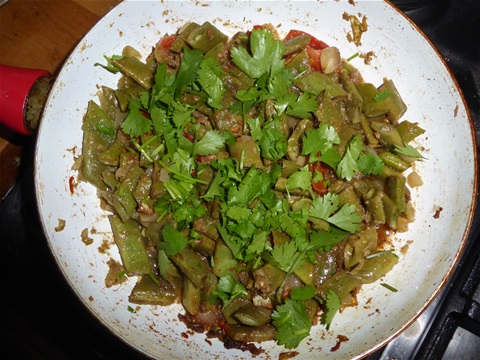
Green bean bhaaji ready to serve
6th September 2017
Eventually the time comes when you really need some other way of cooking runner beans, so last night we had this: Runner Bean Bhaaji. It is not like an onion bhaaji, which is chopped onion fried in spicy batter, but a dish based on a spicy tomato and onion stew. We ate it with plain rice, but if it is made slightly thicker with longer cooking, it would be good with chappatis too.
Runner Bean Bhaaji (to serve 2, or 4 as a side dish)
What you need:
3 cups of runner beans, sliced into pieces about 1cm in length, blanched for 3 minutes
3 tbsp sunflower or vegetable oil
1 medium onion, finely chopped
2 cloves of garlic, peeled and finely chopped or made into a paste
5 cm piece of ginger, grated
1 medium size fairly hot chilli (I used a serrano)
1 tsp ground cumin seed
1 tsp ground coriander seed
2 medium tomatoes
1tbs light soy sauce
1 handful of fresh coriander leaves, roughly chopped
What to do:
1. Gently fry the onion in oil for 10 minutes until soft and almost transparent with tinges of brown around the edges
2. Add the chilli, ginger, garlic and ground spices. Fry for 3 minutes until spices smell cooked
3.Add the beans and fry for 5 minutes, stirring to ensure beans are coated in the spice and onion mixture
4. Cut the tomatoes into quarters and add them to the pan, stirring as they cook to break them up and make a thin sauce
5. Now add the soy sauce, which is salty enough to season the beans
6, Cook for a further 5 minutes, or slightly longer if you'd like the beans very soft
7. Sprinkle the coriander leaves over the top when the curry is served
I have made various versions of this dish over the years, sometimes using french beans in place of the runners. One version omits the ground spices, includes 2tbsp black mustard seeds and a sprinkle of garam masala before serving, another includes chopped spring onions stirred in towards the end of cooking and yet another includes wilted spinach and a touch of nutmeg alongside the listed spices, but omits the soy sauce so has salt added. I am sure there will be many others to come.... it tends to evolve on the stove top really, depending on what I have to hand
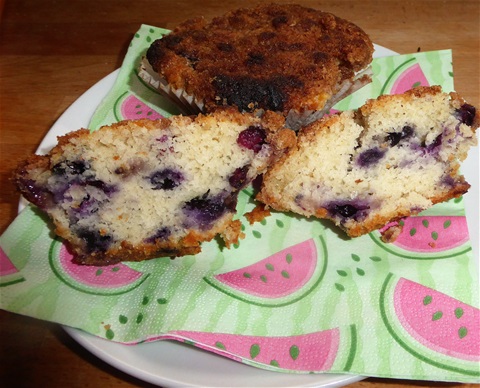
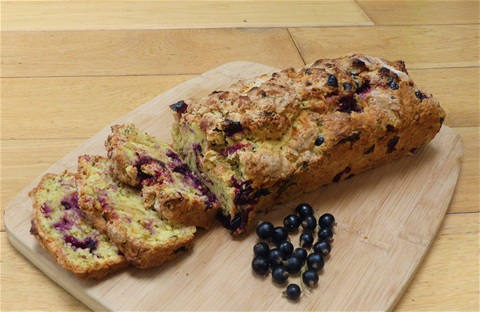
Blueberry muffins cooked standing in a jam tart tray spread out rather flat
17th August 2017
We repotted our blueberry bushes last Spring, and moved them to a sunnier spot in the garden at home. They have repaid us royaly, with a much larger crop than usual. Muffins always go down well, so I attempted a recipe using "cup" measurements, which came out really well for a first attempt. They were a little flat in appearance as I didn't have a muffin tin in which to stand the paper cases, only a jam tart tin, but I shall certainly be buying one as this is recipe to repeat. I decided to add a crumble topping for a bit of crunch, but you can omit this if you like
Blueberry Muffins (Makes 10 large ones)
What you need:
1½ cups self raising flour
1tsp baking powder
3/4 cup white granulated sugar
½ tsp salt
3/4 cup milk
3/4cup sunflower oil
1 medium egg
1½ cups blueberries (Fresh or frozen)
For topping: 1/3 cup flour, ½ cup sugar,2oz butter cut from a block and cubed, 2tsp ground cinnamon
What to do:
1. Preheat the oven (Gas180°C) and stand the paper muffin cases in a tin
2. Put all the dry ingredients in a small bowl and mix up
3. Measure the liquid ingredients and pour into your mixing bowl. Stir together with a large wooden spoon until pale and creamy. This does not take long
4. Add the dry ingredients and the blueberries. Roughly stir into the liquid in the mixing bowl: the mixture should look lumpy. Do not over-mix
5. In the small bowl, rub the butter into the flour for the topping, until it looks like crumbs, then stir in the sugar and cinnamon
6 Carefully spoon the topping over the muffins. Wipe up any that spills onto the tin to avoid it burning
7. Put in the oven and cook for 20 minutes, when they should be golden brown and risen.(Mine were slightly overooked at 23 minutes)
8. Cool on a wire rack. These will store in a tin for a couple of days, and stay moist.
As I have used all our blueberries now, the next batch will be raspberry, and with a proper muffin tin, they should be a more tradtional shape! This is a very quick recipe, which is easily adapted by using different fruit ... chopped apple and black berry would be good..and you can vary the flavour of the topping, using a few drops of vanilla or lemon oil, nutmeg, mixed Christmas spices, ground allspice, or leave it plain.
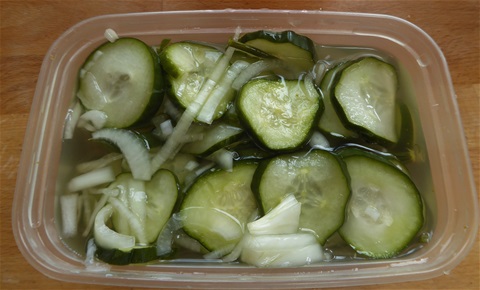
Dilly Cucumber pickles ready to go in the fridge
26th July 2017
With a glut of cucumbers underway, I was looking for a way of using them up quickly, and remembered this recipe, the original of which was from my friend Sue, to whom I am indebted. It is quick, simple and totally delicious! Once you have made it once, you can easily adjust the amounts for more or fewer cucumbers, as long as it is roughly the same proportions.
Dilly Cucumber Fridge Pickles
What you need:
1 cup sugar
1 cup white wine or cider vinegar
1 tbps kosher salt ... table salt does work too, but the cucmber skin goes a bit greyish
2 heads of dill flowers, or five to six dill leaves
1 finely sliced onion (7-8cm across)
3 cups of sliced cucumbers of any kind
What to do:
1. Put all the ingredients into a plastic bowl and mix gently together. It will look a bit dry and unpromising but this is fine
2. Cover with a plate and leave to amalgamate for around five hours. Overnight is OK.
3. You will see that the cucumber slices have shrunk a little and the volume of liquid has increased a lot, as the salt draws the juice out of the vegetables
4. Pour into a plastic box with a lid, with enough liquid to cover the cucumber fully .. and that's it!
I have been told it lasts at least three weeks in the fridge, but to be honest, we have never kept any past three days as it just gets eaten... a side dish with almost anything for lunch, added to salad, in toasted cheese sandwiches, grazing as you go past, you see what I mean! I guess you could add sliced garlic to it if you'd like, or other juicy vegetables too come to that. Try anything you fancy, and do share news of what tastes good
PS Someone asked me if the cucumber stays crisp.. it certainly does!
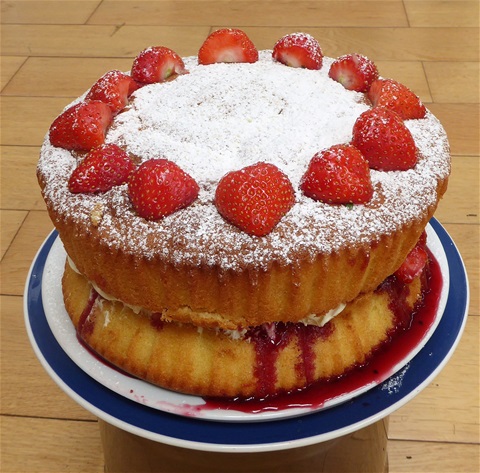
Strawberry Pudding Cake, with wonky sides!!
9th July 2017
I wanted something a little bit different to the usual Victoria sandwich-style jam sponge, to serve to our visitors yesterday, and after a bit of a think, this is it. It used the last few of the strawberries from the hanging basket in the garden to excellent effect too.
Strawberry Pudding Cake
This is a standard sponge mix, but the additional of the jammy filling soaking into the lower cake, lots of which you can see in the photo as it hadn't soaked in when I took this, made it extra moist, and what's not the like about mascarpone cream filling?
I didn't have two tins to fit the pre-formed cake liners, so used 8ins tins and each cake was slightly wider at the top than the bottom, but it added to the rustic appeal, or at least that's what I fondly believe. Yours of course, will have straight sides if you use the right sized tins.
These pre-formed liners, like giant cupcake cases, are really excellent and save me lots of time in not having to cut and butter baking paper. I shall get some to fit my loaf tins too I think. Makes washing up a doddle too!
Making a sponge cake is one of the times I weigh ingredients, as the ratios need to be accurate for the best results
What you need:
8 oz butter (very soft)
8 oz caster sugar
8 oz self raising flour
4 eggs
1 tbp milk
1 cup of sliced strawberries, plus a further 8 halved fruit for decoration
3 tbp jam ( I used Gooseberry & Redcurrant as the jar was on the worktop, but anything that complements strawberries is fine)
2 tbs lemon juice
125g of mascarpone cheese (This was half the pack)
150 ml double cream (a small tub)
icing sugar to dust
What to do:
1. Line two 7 ins sandwich tins and preheat the oven to 180°C
2. Put the sugar and softened butter in a food mixer and blend until light coloured and fluffy
3. Add eggs, mixing slightly after each one. If there are signs of curdling, add a little of the flour
4. Add the milk
5. Carefully add the flour a quarter at a time and gently mix. Once it is all incorporated, mix until creamy and very pale
6. Spoon the mixture equally and evenly into the two lined tins, and bake for 25 minutes, when the tops should be golden brown and spring back when pressed. If they need another couple of minutes, return to the oven
7. Cool for 5 minutes before taking out of the tins and leaving on a wire rack until completely cold. The paper will peel off easily then without tearing the bottom of the cakes
8. Mix the jam and lemon juice in a small bowl until fairly smooth and put in the sliced strawberries. Leave to macerate while the cakes are cooling
9. Once the cakes are cool, make the filling: put the marscarpone and cream in the mixer bowl and beat until light and fluffy and able to hold its shape
10. When the cakes are cold, put one upside down onto the serving plate and carefully spoon on the strawberries and sauce. It will run down the sides, but will soak in, so do not worry
11. Using a spatula, transfer the cream filling onto the second cake and upend this over the strawberries. It might look like too much cream, but it won't be, so do use all of it
12, Arrange the halved strawberries on the top of the cake and dust with icing sugar. (I do this with the cake standing on its plate in the sink as it saves the sugar going all over the place)
13. Now leave somewhere cool for an hour to allow the sauce to soak into the bottom cake. Wipe the edge of the serving plate to remove any excess icing sugar or blobs of jam left. (It will sit quite happily for up the three hours)
And there you have it! It slices easily and will provide 8 large or 10 slightly smaller slices. I there is any left, it stores overnight in the fridge perfectly well.
You could no doubt vary the fruit, or flavour the cake before adding the flour is you wish, and I daresay I shall be having a go at a Blueberry & Lemon version once we have enough ripe blueberries.
5th July 2017
Here are the two recipes I referred to in my blog on Monday, the Roast Broad Bean Crisps, and the Blackcurrant, Mint and Orange Loaf Cake.
To be honest, the bean crisps hardly counts as a recipe, although it is useful to have cooking times and temperatures recorded somewhere, for when I need to make some more. The cake is totally scrumptious and is also rather good toasted and buttered I have found! Some of you may be spotting a bit of a theme with my cake recipes... cup and spoons measures mainly, rather than weighing ingredients, but I do use scales sometimes, especially when weighing sugar for jam or jelly!
Blackcurrant, Mint & Orange Loaf Cake
What you need:
3 cups self raising flour
1 heaped tsp baking powder
3 tbps butter
third of a cup of granulated sugar
2 cups of blackcurrants, stalks removed... use a pair of scissors
5 tbsp chopped mint (I used a mix of spearmint and chocolate mint, but you can use any)
zest from 3 small oranges
1 cup of orange juice
What to do:
1. Preheat oven to 180°C; grease and line loaf tin (I used a long thin tin, but this mixture will fill a standard 9cmx5cmx 5cm one)
2. Rub butter into flour
3. Mix in baking powder, sugar, mint, blackcurrants and orange zest
4. Stir in the orange juice. You are aiming for a "spoonable" mix, not a pouring batter, with no dry flour visible. If there is not quite enough juice, add a little water, just be careful not to make the mix too wet.
5. Spoon the mixture into the tin and level it gently with the back of a wet spoon. Poke down any black currants sticking out to avoid them burning, and sprinkle to top with a little sugar if you like.
6. Bake for 45 mins, covering with foil after half an hour if the top looks very brown. It should be OK, but some ovens are slightly hotter than others. Test that there is no raw mixture left inside, using a thin bladed knife or skewer, and if necessary cook for another ten minutes
7. Cool for 10 minutes in the tin before turning out on a wire rack to cool completely before slicing.
The cake lasts at least three or four days if wrapped in foil or kept in a tin, but you can toast it under the grill if you like too. I wouldn't recommend using a toaster in case bits fall in and burn!
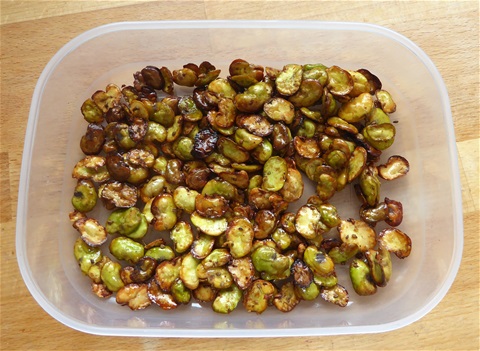
Half the beans were eaten before I took this photo!
Broad Bean Crisps
What you need:
Large broad beans, blanched and skinned... the beans themselves shrink during cooking so small ones virtually disappear: this is a useful way of using those big beasts that have got beyond themselves really.
1 tbps sunflower or olive oil
Spices: I added 2 level tsp of chilli powder and the same of ajwain seeds, together with several good grindings of seaslat and black pepper, for the amount of beans that spread on a 30cm x 40cm tray in a single layer. You can use anything you like the flavour of, or omit spices and only season with salt and pepper
What to do:
1. Preheat the oven to 200°C
2. Put everything in a bowl and mix together carefully, before pouring out onto the tray spread in a single layer. If you have more beans, use more trays, as a thicker layer of beans steams rather than bakes
2. Cook for 30 minutes, turning every ten minutes, until golden brown.
3. Leave to cool and then store in an airtight container
Really, they will probably be eaten quite quickly, as they are very moreish!
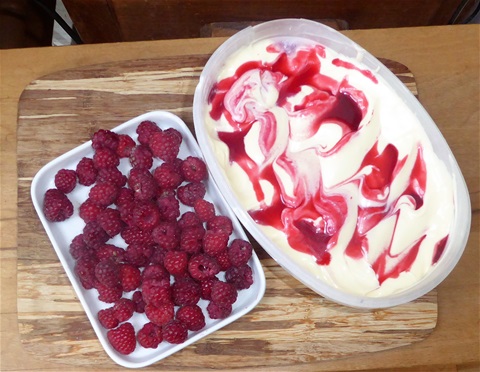
No-churn raspberry ripple icecream
21st June 2017
We have a huge and rather unexpected crop of summer raspberries this year... unexpected because we thought we had dug the plants all out two years ago!! Raspberry vodka is a given in this house, but rather than just freeze the remainder for something in the future, I am trying hard to actually use them right away. Two icecream recipes follow, both very different and neither needing much work at all. So here goes:
No-churn Raspberry Ripple Icecream
What you need:
450g raspberries
½ cup granulated sugar
1 400g tin of condensed milk
600ml double cream
½ tsp vanilla extract
What to do:
1.Put the raspberries and sugar in a saucepan and heat gently until the raspberries are beginning to break up.
2. Sieve the raspberries to remove the pips.
3. Heat the liquid and simmer until it is a thickish syrup. Leave to cool
4. When the raspberry syrup is cool, put the condensed milk and cream with the vanilla, into a mixer and whip until it becomes thick like clotted cream Takes around 5 minutes
5. Put half the cream mixture into the container that will go in the freezer safely, ideally one with a lid(I used an old icecream tub)
6. Using a spoon, carefully dribble about three tablespoons of syrup over the cream, and swirl it in, making sure there are streaks of red, not overall pink icecream
7 Repeat using the rest of the cream. Keep the remaining syrup to use for serving
8. Put on the lid and freeze the cream overnight
The left over syrup can be drizzled over the icecream when serving, but really there is plenty of flavour without it
Raspberry ripple icecream with raspberry sorbet
Raspberry sorbet
This is amazing and unbelievably simple. Just remember it will have raspberry pips in it!! I shall be trying this method using frozen mango chunks from the supermarket as soon as I can, as it really takes just a few minutes to make, plus of course the time for it to freeze.
What you need:
1 egg white
2 cups of raspberries... frozen
3/4 cup caster sugar
What to do:
1. If you have fresh raspberries, open freeze them on a tray before starting to make this.
2. Put all three ingredients in a mixer, either handheld or a stand machine.
3. Run the mixer for 8 minutes, which should be enough time for the mixture to double in volume. Be careful that frozen pieces of raspberry do not come out of the mixer. I had to use a plastic spatula to push the mixture donw off the sides as the machine was running, until it was properly blended
4. Scrape the mixture out of the machine and into a container suitable for the freezer. I used the cream tub from the previous recipe, which was about a spoonful too small. I froze the extra mixture in a blob in a lidded takeaway style container (Good excuse to have to eat that portion as a "tester")
5. Freeze the mixture overnight.
This is such a beautiful colour, and with so few ingredients the flavour of raspberries is crisp and clean.
The reason there are both desserts in this photo is because someone could not choose betwen them so had some of each
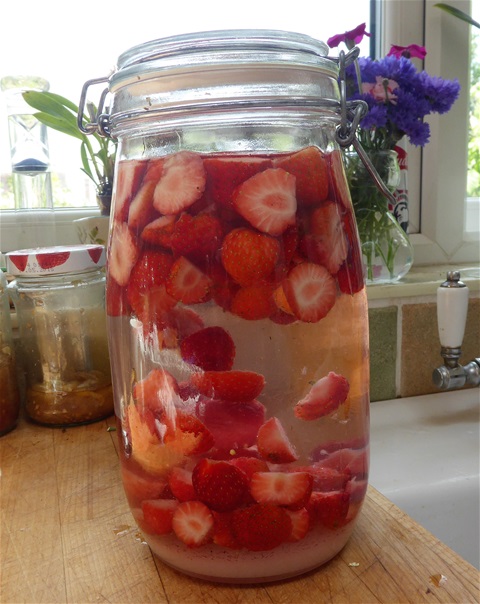
Strawberry vodka starting infusion
19th June 2017
We seem to be picking strawberries every day at the moment, so I have had enough to start off a strawberry flavoured vodka, which even after a couple of days is laready looking much more pink that this photo! It is dead easy and should appeal to anyone who enjoys summery drinks.. alcoholic ones, I mean of course. Perfect with ice and a slice of fresh strawberry, with or without soda water
Strawberry Vodka
What you need:
1 l of vodka
3 cups of roughly chopped strawberries
3 tbsp white granulated sugar
What to do:
1. Put everything in a large jar that can seal tightly, and shake gently to start to dissolve the sugar
2. Leave somewhere relatively dark, shaking daily, until the sugar is dissolved
3. Leave for 3 weeks and then filter into clean bottles (I use a very fine conical sieve)
4. Drink
That easy! If you would like more or less of a strawberry taste, increase or decrease the infusion time. (What a good excuse to taste it every week) It makes great gifts in pretty bottles, just make sure you keep some for yourself....
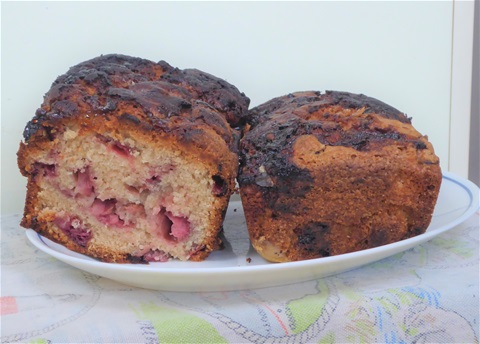
Strawberry loaf cake
15th June 2017
For the first time ever we have a bumper crop of strawberries, well, at least a kilo or two, which for us is a huge crop. Putting cloches over the plants outside has deterred the rodents somewhat and the plants in troughs in the new polytunnel greet us with the glorious aroma of warm berries every morning.
I do like a good quick cake recipe and this one turned out so well I am storing the recipe here, and of course you can then share it too! This is another of those "cup measurements" recipes which means it is very straightforward indeed.
Strawberry Loaf Cake
This makes two cakes in 9cm by 5cm loaf tins: one to keep and one to share
What you need:
3 cups of self raising flour
2 cups of sugar (I used white granulated today but golden would be good too)
1 heaped tsp of ground cinnamon
pinch of salt
4 eggs
1 1/4 cup of sunflower oil
4 cups of chopped strawberries
butter to grease tins
What to do:
1 Preheat the oven to 175°C, grease the tins and flour the inside, shaking out any excess gently
2. Put the flour, cinnamon and salt in a large bowl and mix together
3. Put the sugar, eggs and oil in a second bowl and mix until well incorporated
4. Pour the liquid ingredients into the dry ones, and mix quickly to ensure there is no dry flour remaining
5. Stir in the strawberries
6. Divide between the two tins and bake for an hour.
7.Test with a skewer to check there is no raw cake mix left. If there is any, then bake for a further 10 minutes
8. Leave the cakes to cool on a wire rack for 40 minutes before removing from the tin and allowing to cool fully before slicing (although it is delicious slightly warm I found!)
One addition could be jam: I used up the odds and ends of a couple of jars in the cupboard, swirling it into the top of the raw cake batter before baking (about 3 tbps per cake) the issue was that I left too much of it exposed to the heat of the oven so it caramelised, which didn't look too good although it tasted fine. Another time I would keep back enough cake batter to cover the jam completely.
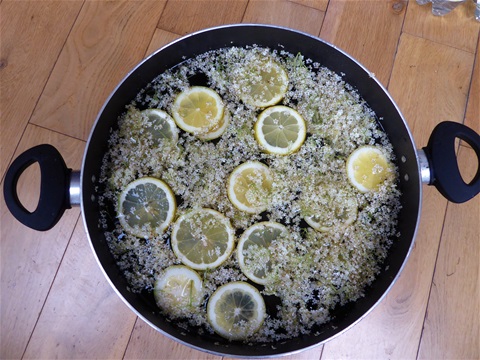
Elderflower Champagne ingredients just put into the preserving pan
13th June 2017
Here, elderflowers are nearing the end of their season, with lots of flowers dropping their petals and developing tiny green berries. I was lucky enough to find some latecomers that had freshly opened, with lots of lovely yellow pollen still on them, so decided Elderflower Champagne was definitely the order of the day. I last made this many years ago, ago, and it was a disaster as I did not strain in properly and so the bottles developed an unpleasant sediment at the bottom.
This time, older and slightly wiser, I am having another go. I have left posting this recipe until the neo-natal champagne was bottled, with no lurking bits and evidence of bubbles, so I could make sure things were on track... so far so good! I am looking forward to being able to drink my own, and have enough to share with friends, who have generously shared theirs with me in the past
Elderflower Champagne:
What you need:
12 large freshly picked elderflower heads, with plenty of pollen visible
8 l cold water
800g white granulated sugar
2 sliced lemons
2 tbsp white wine or cider vinegar
Plus:
4 x 2l very clean empty plastic drinks bottles with a screw on lid ... I have been told that glass bottles are not suitable as they may explode: I am not going to find out the hard way!
A large enough container to accommodate the 8l of liquid: I used a large preserving pan, but a plastic bucket would also do.
A lid or a clean teatowel to cover the liquid and keep insects etc out
What to do:
1. Put the water and sugar into the preserving pan and stir until sugar dissolves
2. Add the vinegar and sliced lemons
3.Carefully pick off as many of the flowers as possible, leaving hardly and green stalks, putting them straight into the preserving pan so as not to lose any pollen. Stir gently and cover
4. Leave somewhere cool for 24-36 hours. The liquid may turn slightly milky, which is fine
5. Remove the floating lemon pieces and most of the flowers with your (washed!) hands
6. Using a very fine conical sieve over a funnel, pour the liquid into the prepared bottles. I found this easiest from a jug. Leave a couple of inches of space at the top of the bottles before lightly screwing on the tops
7. Leave the bottles somewhere cool (not in the fridge) so that the natural yeasts from the flowers can begin to ferment with the sugar. This results in carbon dioxide bubbles and you will see these streaming up inside the bottles. The lids are left loose so that this gas can escape. If the bottle start to bulge, then very slowly release the pressure by undoing the lid slightly more. Standing the bottles in a deep plate to do this saves a mess in case any liquid bubbles over.
8. After about 10-12 days, bubble production will slow down and the lids can be screwed on tightly to build up some fizz in the drink.
9. Now is the time to store the bottles in the fridge. Keep an eye on them in case fermentation is still quite rapid, and release some pressure if they start to bulge
10. After a week, it is ready to drink. Open the bottles carefully! It does keep well in the fridge, until the strat of the next elderflower season I have been told, but I don't think ours will be around long enough to find out!
This is absolutely delicious with ice and lemon, or just chilled straight from the fridge
NB This drink is slightly alcoholic at between 1% and 3 %
June 2017
May 2017
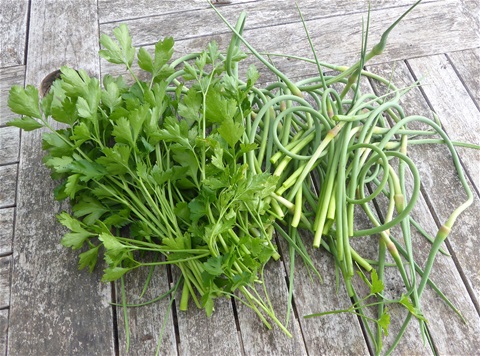
In case anyone is unsure as to what scapes look like.. this is them with the parsley
30th May 2017
Those curly-wurly flower stalks that grow up from the middle of garlic leaves at this time in the year are delicious, so don't put them straight in the compost for goodness sake! There is really only one crop in the year, so I like to make something special with them, Here this year it is ....
Garlic Scape Pesto
This has a powerful flavour of spicy garlic alright, and can be used for anything you would use the traditional basil-based pesto for. Ours went into hot pasta with some slightly softened orange sweet peppers and an extra sprinkle of cheese. The recipes is simplicity itself... I use an old smallish mug as my cup-measure, but as this is about proportions any cup will do the job) I used walnuts as that is what I had, and the parsely to give a deeper flavour
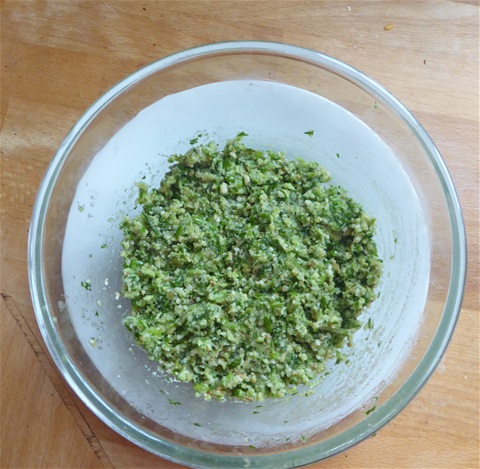
The finished pesto
What you need:
1 cup of garlic scapes cut into pieces about 5-6cm long
½ cup flat leaved parsley
½ cup of walnut halves
½ cup olive oil (I used a fairly cheap one as I find the flavour of some extra virgin ones competes with the other ingredients. A matter of taste of course)
0.5 cup grated parmesan
large pinch of salt
What to do:
1 Blitz all the ingredients except the parmesan until a rought textured paste is made. You might need to scrape down the side of the mixer a bit, and possibly add more oil if it seems a bit dry. You don't need it completely smooth though
2. Add the parmesan, carefully incorporate and remove pesto to a small bowl
And that's it!! It is so delicious it is hard not to eat it with a spoon to be honest and I had to wrest the bowl back from my neighbour two doors down, who came round for a chat. This amount feeds two generously, provided no-one has eaten too much before it gets onto the pasta of course. It sits happily in the fridge for a few days, with a little oil on the surface to stop it drying out. Best to cover it tightly though or your whole fridge will smell of garlic for sure!
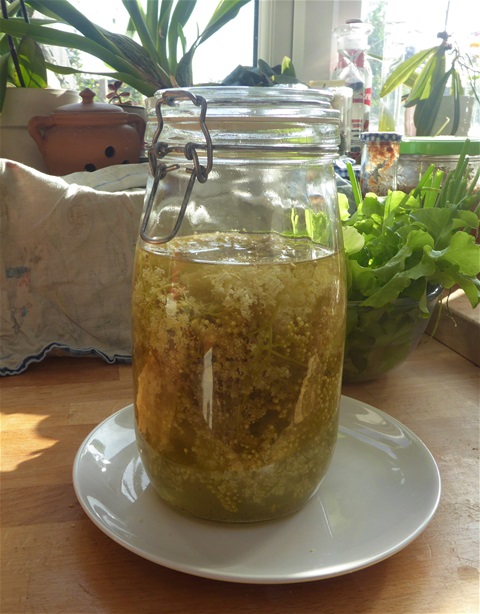
24th May 2017
As the Elderflowers begin to open, I start to dream of all the lusciousness that can be created using them. Last year's "bests" were Elderflower Cordial (of which we still have 2 litres left) and Elderflower Gin. As we have so little of this remaining it is top of the list to make, and as you can see, the first batch is in and doing!
This is such a simple recipe but the outcome is so delicious you will want to make more than one batch. Elderflowers have such a short season that if you want to taste the results first, you'll have missed your chance, so pick some more and freeze them in a thickish plastic bag : they'll last as good as fresh for a couple of months easily. I am fortunate in having Elder trees on our allotment site, a long way from a road or railway track. Just be mindful of foraging anywhere the blossoms might be heavily polluted.
Elderflower Gin
What you need:
- Elderflowers to loosely two-thirds fill a large jar with a lid that seals well. The thin green stalks that support the tiny flowers are fine, but remove the thicker ones that splay out from the main stem
- Gin to cover the flowers by about 5cm
- 4tbsp white caster sugar
As a guide, this jarful has 20 heads of flowers and a litre of gin
What to do:
1. Pick and prepare the Elderflowers. The best time to gather them is when you can see plenty of pollen still on the flowers, but they have dried after any morning dew. Gently shake off any insects
2. Put the flowers in your previously sterilised jar
3. Add the gin to the required depth
4. Measure in the sugar and seal the lid
5 Shake gently to dissolve the sugar, but if a little is left it will not matter for now
6. Put the jar in a cool dark place and leave, shaking every day, or as often as you remember. It is fairly forgiving.
Now at the point some people tell you to leave it for a week, some for a month, but from experience I found about two months to be good. You can of course use this as the perfect reason to have to keep tasting it!
7. After tasting, if it is not sweet enough, add up to 2 more tablespoonsful of sugar, Leave then with regular gentle shaking for a further month
8. Filter the gin into clean bottles, then label. (I use that "indestructible" kitchen roll and a funnel, which seems to do the job very well)
And that's all there is to it! You can substitute vodka for the gin if you wish, although personally I love the combination of the juniper/herby flavour of the gin with the musky elderflower. Drink neat with ice or diluted with tonic or fizzy water. Just gorgeous!
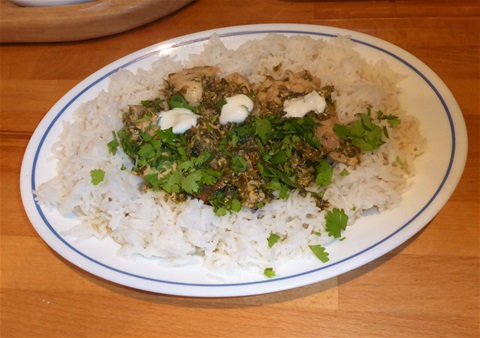
Chicken with green coriander, served with plain basmati rice
At this time in the year we can all be so busy some herbs get forgotten, so here is a reminder as to why a lot of coriander is a very good thing, and now is the time for sowing it. This dish has been a favourite for many years, inspired by a recipe from Madhur Jaffrey about twenty years back. If you do not like your food too spicy, reduce the amount of green chilli, but the flavour is an intergral part of the dish, a different taste to the one you get from using chilli powder, so try not to miss it out completely. Serving with some extra plain yoghourt can tame the spiciness if you need to
Chicken with Green Coriander
What you need:
6 skinned and boned chicken thighs
6tbs plain yoghourt
1 or 2 large fresh green chillies
large bunch of coriander
6 cloves of garlic
2 x 3cm pieces of ginger
3tb sunflower oil
pinch of salt
1tbsp lemon juice
1 medium sized tomato
1 tbp tomato puree
2tbps fresh, chopped coriander to serve
What to do:
1.Peel and roughly chop the ginger and garlic and blend to a paste with the salt and lemon juice, plus 1 tbps water
2. Rub this marinade into the chicken and leave for at least an hour, or up to 12 hours in the fridge
3. Put the washed coriander (leaves, stems and roots), chopped tomato, tomato puree, rough chopped chillies (leave the seeds in for extra heat), and 2 tbps water into the blender and whizz until reasonably smooth
3. Heat the oil in a large pan (I use a non-stick wok that has a lid) and fry the chicken until just coloured, tipping in any extra marinade too. Takes about 8 -10 minutes
4. Add the paste from the blender, and continue to cook until the oil begins to separate out.
5. Add the yoghourt. Stir until the yoghourt is incorporated into the sauce, and the oil is seen around the edges. Takes about 5 - 6 minutes.
6. Now put on the lid and cook on a low heat for a further 10 minutes, Take care that the sauce does not stick, adding a spalsh or two of water if needed. The sauce should be thick though, not watery.
The coriander does lose some of its beautiful green colour during the cooking process, although not its flavour. Before serving, sprinkle some freshly chopped coriander over the dish to add an extra zing.
If serving with plain rice, make sure the sauce is not too thick to mix with the rice, but if serving with chappatis (our favourite) or naans, the sauce does need to be thick enough to cling to the meat.

This is another way of using wild garlic leaves in their short season, together with purple sprouting broccoli. Our PSB has been so prolific I have been glad of another way to use some of it, really. If you don't have wild garlic leaves you can substitute spinach, and having made both versions, they are both delicious. This does not need precise amounts of vegetable, so vary these depeending on taste. You could omit the leaves altogether of course!
Broccoli in cheese sauce: This amount made two small dishes suitable for lunch
What you need:
A good handful of either wild garlic leaves or spinach, with tough stalks removed
Enough broccoli to two-thirds fill the two dishes, trimmed and cut into pieces about 5cm long
1tbs butter
1 tbsp plain flour
½ cup milk
1 level tsp of mustard powder
1 cup grated cheese, such as cheddar
2 eggs
ground black pepper to taste (plus grated nutmeg if using spinach)
What to do:
1. Preheat the oven to 200°C
2. Blanch the wild garlic or spinach leaves for 2 minutes. Squeeze out as much water as you can and chop them roughly. Season with ground black pepper (plus grated nutmeg for spinach) and divid between the two oven-proof dishes
3. Blanch the broccoli for 2-3 minutes, drain well and add to leaves in each dish
4. Melt the butter in a small saucepan, stir in the flour until combined and then add the mustard powder and milk. Keep stirring until a fairly thick white sauce is made. Take off the heat and stir in all except 2 tbp of the cheese. (The broccoli will give out juice while the dish is cooking and make the sauce thinner)
5. Pour the sauce equally between the two dishes and bake in the oven for 10-12 minutes
6. Make a depression in the centre of the sauce mix in each dish and carefully break an egg into each. Sprinkle the remaining cheese over the top and bake for 8 minutes until the top is bubbling bt the yolk is still runny. (I added some finely cut onion green before serving, plus a further grind of black pepper)
This can be served in the dish, with buttered toast on the side, or alternatively cooked in one dish without the egg as a side dish to serve with roast dinner or with fish.
April 2017

Scones with cheese and wild garlic leaves
I seem to have been very lazy about posting recipes recently, but this is one I would like to keep track of, and hope others find it interesting too. I have often made cheese scones with chives, so the idea of them with wild garlic leaves instead of the chives seemed a possibility... here we go:
Scones with cheese and wild garlic leaves
What you need:
250 g self raising flour
1tsp baking powder
pinch of salt
50g butter
35g finely chopped wild garlic leaves, minus the thicker bottom stem sections
100g grated cheese (I used cheddar but any well flavoured cheese would be good)
1 egg
milk
What to do:
1. Preheat the oven to 200°C and organise your baking tray.( I used a silicon sheet lightly dusted with flour but you could also butter a tray)
2. Weigh out the flour directly into the mixing bowl, add the salt and baking powder.
3. Weigh the butter into the bowl (Set the scales to zero again first) and rub it in until the mix looks like breadcrumbs
4. Set the scales to zero once more, and grate the 100g cheese straight into the bowl
5. Add the chopped leaves and combine everything evenly with a table knife
6. Add the egg, and enough milk to make a soft mix that easily comes together, using the knife to mix
7. Tip out onto a non-stick sheet, or your worktop, and pat into a piece about 2cm thick
8. Make eight scones using a 6cm cutter. Re-form the last bits to make the final scone
9. Brush the tops with a little milk
10.Bake for 12-13 minutes and then cool on a wire rack. They will be light golden brown underneath when cooked.
Totally delicious when warm and buttered, and will keep in a tine for a day or two.
Using the method of keep returning the scales to zero before adding the next ingredient means you are left with little washing up. You can make these start to finish in less than 20 minutes!
Sandra Ashcroft
Have you got a recipe for fig jam please?
Kathy
http://allrecipes.co.uk/recipe/16504/fresh-fig-jam.aspx
You could try this one as a starter... I don't add vanilla though, and like to include lemon zest. It is pretty good then!
Ravi
This is a great recipe, just made some and added some turmeric, thank you again for sharing.
Kathy
Turmeric sounds a great addition: thanks for that idea Ravi!